Conducting a central water supply to a private house. How to conduct a central water supply to a private house
Water supply at home is an objective condition for the normal living of its inhabitants. SNiP 2.04.01-85 "Consumer water consumption rate" regulates water consumption in the range from 80 to 230 liters. per day per person. Consumption depends on the availability of centralized water supply, sewerage, a bath or shower, the presence of a column for heating water and other factors.
In multi-storey and communal buildings, this issue is resolved by connecting to the central water supply system. For a private country house or cottage, you have to provide water supply yourself.
Of course, once you can bring water from an external source in the amount of needs, it will not be difficult. But how to provide a family with water for a long time?
This article will help to solve this problem, in which the types of water supply, schemes, systems and methods for their construction are structured in detail. It also indicates the nuances of doing the main types of work with your own hands.
Types and methods of water supply of a private house
From the standpoint of the dependence of the source of water supply on external factors, two fundamentally different types of water delivery to the user can be distinguished:
Centralized water supply at home
In fact, the same autonomous, but within the region. In this case, the user does not need to take care of arranging the source of water supply. It is enough to connect (crash) to the central water main.
Connecting the house to the central water supply
All actions are reduced to the phased implementation of a number of requirements, including:
- appeal to the regional municipal organization MPUVKH KP "Vodokanal" (Municipal enterprise "Department of water supply and sewerage"), which controls the central highway;
- obtaining the technical characteristics of the tie-in. The document contains data on the place where the user's pipe system is connected to the main and its depth. In addition, the diameter of the main pipes is indicated there and, accordingly, instructions for choosing home piping. It also indicates the water pressure indicator (guaranteed water pressure);
- get an estimate for connection, which is developed by a utility or contractor;
- control the execution of work. Which are also commonly performed by UPKH;
- perform a system test.
Advantages of central water supply: convenience, simplicity.
Disadvantages: fluctuations in water pressure, questionable quality of incoming water, dependence on central supplies, high cost of water.
Autonomous water supply at home
It is possible to independently provide water supply to a summer house, private or country house using autonomous water supply. In fact, this is an integrated approach, which includes activities for the installation of a water supply system, starting with providing a source of water supply, ending with its discharge into the sewer.
An autonomous water supply system can be represented as two component subsystems:
- water delivery: imported, groundwater, from an open source;
- supply to consumption points: gravity, using a pump, with the arrangement of a pumping station.
Therefore, in a generalized form, two water supply schemes can be distinguished: gravity (storage tank with water) and automatic water supply.
Using the container (water tank)
The essence of the autonomous water supply scheme at home is that water is supplied to the tank using a pump or filled manually.
Water flows to the user by gravity. After all the water from the tank has been used, it is refilled to the maximum possible level.

Its simplicity speaks in favor of this method, it is suitable if water is required from time to time. For example, in a dacha that is not often visited or in a utility room.
Such a water supply scheme, despite its simplicity and cheapness, is too primitive, inconvenient and, moreover, creates significant weight on the interfloor (attic) floor. As a result, the system has not found wide distribution, it is more suitable as a temporary option.
Using the automatic water supply system

This diagram demonstrates the operation of a completely autonomous water supply system for a private house. Water is supplied to the system and to the user using a system of components.
It is about her that we will talk in more detail.
You can implement a completely autonomous water supply of a private house on your own by implementing one of the schemes. There are several device options to choose from:
1. Water from open sources
These can be surface sources: ponds, rivers, lakes. In some cases, such sources may be water purification systems. But, in our country they are not yet common.
Important! Water from most open sources is not suitable for drinking. It can only be used for irrigation or other technical needs.
Obtaining water from an open source requires the creation of sanitary protection of water intake points and is regulated by the provisions of SanPiN 2.1.4.027-9 "Zones of sanitary protection of water supply sources and water pipes for domestic and drinking purposes."
2. Water from underground sources: basins and aquifers
This water is, in most cases, suitable for consumption.
How to conduct water in a private house with your own hands
A step-by-step guide to choosing and installing water supply in a country cottage or in a country house from A to Z

The house water supply scheme consists of the following elements:
- water source;
- pipe system;
- pump, hydraulic accumulator, automation relay;
- filters;
- fittings, valves, non-return valves and plumbing fixtures;
- water heating equipment (for hot water supply);
- sewerage.
Element 1. Water source
Starting to provide autonomous water supply, it is necessary to determine the source of water supply and equip it.
Among the subspecies of autonomous water supply with an underground source of water supply, there are:
1.1 ordinary well;
1.2 Abyssinian well;
1.3 well "on sand";
1.4 artesian well.
The final choice will depend on the type and characteristics of the soil, the depth of the water, and the productivity of the water vein.
1.1 Ordinary well
A traditional well is preferred when the water vein is at a depth of 4-15 m. These are the so-called interlayer water sources. In addition to the depth of occurrence, it is important to determine the performance of the core. The incoming water should be sufficient to meet the needs of the family and/or household. Through the well, it is possible to ensure the flow of water at the level of 500 liters / day.
The undoubted advantages of the well are:
- independence from electricity supplies. So in the event of a power outage, water can be taken with a bucket;
- long service life (up to 50 years), which is proven in practice;
- low cost of work;
- the simplicity of the device.
It should be noted that in view of the shallow depth of water intake, it may be of poor quality. This is due to the likelihood of groundwater entering the well. Also, the well is characterized by drops in water level.
Important! When equipping a well, you need to properly position it in terms of distance from ground buildings. It should not be located close to buildings, the optimal distance is 5 m (it will prevent erosion of the foundation of the building). At the same time, the distance to direct sources of pollution (gutter, toilet, other sources) should be at least 50 m.
To dig a well, you need to perform a number of actions:
- take a water sample;
Important! Before you arrange a well on your site, try the water from your neighbors, or even better, hand it over for analysis. It may happen that the water will be unusable and all efforts will be in vain.
- obtain a conclusion on the quality of the soil and the depth of the aquifer. In practice, wells are often dug "by eye";
- determine where to dig the well. To do this, you can attract specialists, use special devices - indicator frames. And you can watch the dew for several months. The largest accumulation of dew in a certain place indicates the proximity of water;
- choose building material for finishing the walls of the well (mine). The most commonly used materials for this purpose are:
Reinforced concrete rings, which are made in factories or cast independently. Their diameter is 1-1.5 m.p., and the estimated service life is up to 50 years. The obvious advantage of using rings is the possibility of deepening up to 20 m, high speed and greater safety of work. In addition, rings are installed as work progresses;
Small-piece materials: brick, rubble stone. This material is suitable only for wells with a depth of no more than 3-4 m. Its use significantly increases the complexity of the work;
Processed logs. For finishing the shaft, wells are suitable for logs made of wood that is resistant to staying in conditions of high humidity. These include oak, larch, pine. The diameter of the logs must be at least 120 mm.
- dig a well shaft. To reduce the cost of work, this is usually done manually. You can determine the size of the mine in this way: measure the diameter of the concrete circles, measure their thickness and add 10-15 cm to the backfill. Then, with a circle diameter of 1 m and a thickness of 10 cm, the diameter of the shaft will be 1.4 m. If you plan to use another material, for example, brick, then it is enough to indicate the desired well diameter and add two material thicknesses to it;
- finish the well - internal and external.
1.2 Abyssinian well
Water supply of a country house from an Abyssinian well or well-needle is the easiest way to get water at minimal cost. To do this, just follow a series of actions:
- check the water
- choose a place under the well;
- hammer a well-needle;
- install a check valve and a pump (manual or automatic).
The reason for the increased popularity of wells is the purity of the incoming water, tightness, ease of drilling, the ability to connect a pump, and a long service life (up to 30 years), a significant amount of incoming water - more than 1000 l / day. Among the disadvantages are the shallow depth of clogging and dependence on the composition of the soil.
1.3 Well "on the sand"
In this case, water also comes from interstratal sources. A sandy well makes it possible to obtain cleaner water, since the aquifers are located after the loam that filters the water.

Thus, a well is used if the depth of the aquifer reaches 40 m.
The well has a shorter service life (up to 10 years) and allows you to get up to 50 cubic meters. water per day. The well is distinguished by ease of drilling, less excavation.
A detailed description of how to make a well with graphic visualization is presented in the video
1.4 Artesian well
Allows you to use water from considerable depths. The depth of the well reaches 150 m, which makes it possible to obtain high quality water. The unlimited supply of water is also an argument in favor of an artesian well. At the same time, the service life of the well increases compared to the previous option up to 50 years.
The method of drilling an artesian well is identical to the previous one. The only difference is that the mechanical drilling method is used: auger, rotary, core or shock-rope. The design of the well is shown in the diagram.

Important! According to the law, artesian water is a strategic reserve of the state. Therefore, there is a need to register an artesian well.
Element 2. Pipes for water supply
Water supply cannot be organized without the installation of an extensive pipe system, both external and internal, and a water tank.
For wiring, galvanized, polyethylene, polypropylene or metal-plastic pipes are used.
Important! Using plastic pipes will prevent rust and leakage. They are also more convenient to give the desired shape. Estimated service life of a polypropylene pipe is 50 years.
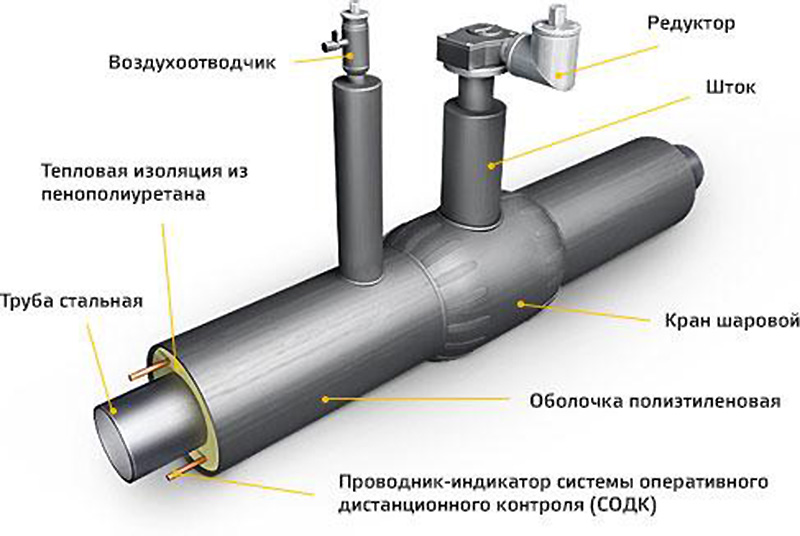
 External pipes are laid in the ground.
Important! The depth of pipe laying depends on the level of soil freezing (indicated in SNiPs, for central Russia, the depth is about 1.5 m.). Pipes are located below this value. In this case, the system is not threatened by freezing and, as a result, deformation.
Advice. To prevent stagnation of water in the pipe, it must be laid at an angle to the house.
Next, one end of the pipe is inserted into the house (for this, a hole is left in the foundation into which a steel pipe is placed. It will prevent the water supply pipe from deforming if the house shrinks). The second one is lowered into the well.
Element 3. Pump or pumping station for water supply
 The pump can be installed in the house (basement or utility room)
 And it can be installed in a caisson or pit (directly above the well). The diagram shows the installation of a submersible pump and a surface pump in the caisson.
To get a caisson, you need to dig a hole 2-3 m deep. Lay a sand-gravel cushion on the bottom and fill it with concrete. It is convenient to lay out the walls with bricks. A pump is installed in the caisson, and the contour of the caisson is poured with concrete (a layer of about 0.4 m).
There are two types of pumps:
 Submersible pumps. They are immersed in water (a well, a well) and raise water. For convenience, these pumps are equipped with automation, which allows you to pump water from home.
 surface pumps. They are pumping stations equipped with a hydraulic accumulator and a relay.
 The hydraulic accumulator performs the functions of a water tower.
 Relay - regulates the pressure of the pumping station.
The principle of operation of the surface pump
The principle of operation is as follows: the pump supplies water to the accumulator, which accumulates it. After the water is turned on in the house, the pressure in the system decreases. After reaching a critical level of 2.2 bar, the relay turns on, which in turn turns on the pump. The pump supplies water to the accumulator until the pressure is restored at around 3 bar. After that, the relay turns off the pump.
You can choose a pump based on the following data:
- depth of water (bottom of a well or well);
- the height of the water in the source shaft;
- height of the draw point;
- the volume of water consumed (m.cube).
The water intake pipe of the pump is lowered into the source. To avoid clogging of the pipe, filters are installed on its edge.
Important! The pipe is installed at a distance of 20-40 cm from the bottom (gravel pad). The distance is determined by the height of the water at the source.
Advice. So that the pipe in a traditional well does not move, it must be fixed to a special pin located at the bottom.
Element 4. Filters for the water supply system
Cleaning the water entering the pipe system is an important aspect of the water supply at home. Two types of filters are used for cleaning:
The first is installed on the edge of the pipe placed in the well. It purifies water from mechanical impurities;
The second is directly in the house and can be a complex multi-stage filter system. The scheme of water purification in the figure.

Element 5. Fittings, valves and plumbing
These are the elements that are necessary for hermetically connecting pipes to each other and to other devices.
Important! To prevent rupture of the system and water leakage, try to use only high-quality shut-off valves.
Plumbing fixtures include: taps, drain tanks, water locks (siphons). Don't skimp on their quality either.
Element 6. Water heating equipment
 They will be needed if there is a need for hot water supply, i.e. almost always.
Important! To equip hot water supply, it is necessary to provide for a separate outlet to the heater.
In this case, there are several options for choosing heating equipment:
- double boiler. It will simultaneously heat water for heating and domestic needs;
- single boiler. Designed exclusively for heating water for the needs of users. A boiler is required for such a boiler. In this case, the boiler can be accumulative or flowing. In the first case, it becomes possible to heat a large volume of water;
- electric storage water heater, which allows to satisfy the need for hot water of a significant number of users;
- several instantaneous water heaters. They will heat water for each consumer separately. Such a system allows more rational use of electricity for heating water.
Element 7. Sewerage
After the place for draining the used water is determined, the process of arranging the water supply can be considered complete.
Water drainage is a mandatory component and the more water is consumed, the more it needs to be diverted. So you need to approach this stage responsibly. There are also two options here:
- crash into the central sewer;
- equip your own autonomous sewer. A septic tank or septic tank is designed to collect water. Concrete and plastic septic tanks are shown in the photo. And their volume and quantity (total volume) depends on the amount of water consumed.

The video substantiates the rules for the construction of a septic tank for a country house.
The process of water supply from design to construction is shown in the video
Conclusion
As you can see, there are different water supply schemes for a private house, from simple to complex, respectively, some will cost less, while others will cost more. Also, the cost of water supply is affected by the structural solidity, i.e. you will need a water supply device that works periodically (temporarily) or year-round - in winter and summer. In any case, the implementation of each system is possible with your own hands, but requires knowledge and skills.
Today we’ll talk about how to equip a water supply system in a private house. I have considerable experience in this matter, I am ready to tell you how to draw up a project, select materials and mount the system quickly and efficiently without outside help. With this knowledge, almost any master will cope with the task!

Description of the workflow
We divide the work into 3 parts:
- Calculations and purchase of materials;
- Laying the outer part of the system;
- Laying the inside of the system.
Calculations, design and purchase of materials
Water can be supplied in three ways:
- Taking water from a well. Most often this option is found in rural areas. In this case, a pumping station is installed in the house, which pumps water into the house. A diagram of such a system with an indication of all components is shown below;

- Water intake from a well. The pump pumps water directly from the water source, so there is no extraneous noise in the house, and the system itself consists of simple components that are in every plumbing store;

- Connection to the central water supply. This is the most preferred option, but not every locality has running water, especially when it comes to rural areas. If you are lucky and you can connect to the central system, then your circuit will look something like the figure below.

Now we will analyze the features of drawing up a water supply scheme for a private house with our own hands. There is no universal option here, you must decide in advance where the water consumers will be located and, based on this, draw up an approximate sketch.

Necessary materials:
| Illustration | Description |
 |
Pump. Required if water is taken from a well or well. Its configuration depends on the system and is selected separately in each case. |
 |
HDPE pipe (low pressure polyethylene). It is used for laying the outer part of communications.
|
 |
Fittings for HDPE pipes. The exact number and configuration of components are determined by the project. As an example, use the diagrams that are presented above, it shows in detail where certain fittings are used. |
 |
Polypropylene pipe. Use the reinforced version (the photo shows how to determine it by eye), it is suitable for communications with cold and hot water. The optimal diameter is 20 mm, it is enough even with a large amount of water consumption. The number is calculated according to the length of all pipelines in the house. |
 |
Distribution manifold. It is necessary to maintain the same pressure on all lines of the system. Serial connection without a comb (as the collector is also called) is allowed in small houses where no more than 3 people live permanently. |
 |
Fittings for polypropylene pipes. Calculated according to the system design. Each turn, branch and connection is made by a fitting, so the assortment and quantity are different in each house. |
 |
Fasteners. To fix the pipes, special clips are used, which can be interconnected if you need to run several highways. The elements are fastened to the wall with dowels or self-tapping screws, it all depends on the type of surface. |
Now let's deal with the tool that is needed when doing the work with your own hands:
- Apparatus for welding polypropylene pipes. In common people it is called a soldering iron. This is the main tool with which the installation of water supply in the house is carried out, the price of the simplest options is about 1500 rubles;

- Pipe shears. A special device that allows you to cut plastic pipes at a perfectly right angle. With it, you can cut elements with a diameter of up to 63 mm;

- sharp knife. Sometimes there are burrs on the ends. To cut them, keep any knife handy.
- Composition for degreasing pipes. Alcohol-based solutions are sold, with which the ends of the elements are processed before joining. Also on sale you can find special wet wipes for these purposes.

Laying the outer part of the system
This part of the work consists of the following steps:
| Illustration | Stage description |
 |
Digging a trench. It can go to a well, a well or a centralized water pipe. The depth should be below the freezing point of the soil in your area. If it is impossible to dig to the desired depth, then it will be necessary to lay the pipe in a special one. |
 |
If you have a well, then the pipe is connected to the pump. This is done simply and quickly with the help of a special fitting. The power cable is attached to the pipe using plastic clamps. |
 |
If you have a well, then an intake pipe is placed. It is attached through the knee, a strainer is placed at the end to protect the system from sand and other impurities. |
 |
Tapping into the central water supply is made using a coupling. It is put on the pipe, after which a hole is drilled and a tap is screwed in. No welding is needed. |
 |
The pipe is laid in a trench. Everything is simple here - the main thing is to carefully lay communications and bring them to the house. Make sure it's long enough. |
 |
The pipe is led into the house. Before you bring it under the foundation, I advise you to insulate that part of the structure that goes up, since it is the water supply to the house that freezes at low temperatures. |
 |
Mounted entrance to the house. A swivel coupling is installed, a crane is attached behind it. Next comes a strainer with a sump and a water meter (if you have a centralized option), followed by a splitter for hot and cold water. If the water supply is from a well or a well, then a meter and a splitter are not needed, a pressure gauge is located in their place. |
Laying the system in the house
Do-it-yourself plumbing in a private house is done as follows:
| Illustration | Stage description |
 |
Soldering iron preparation. To do this, nozzles of the size you need are first placed on the tool, after which it is located on a flat surface or fixed on a tabletop if a clamp is provided in the design. The kit always comes with instructions, be sure to read it to know the warm-up time and other rules for operating the equipment. |
 |
The pipe is cut into pieces of the desired size. First, measurements are made, after which the pipes are marked. You need to cut carefully, holding the tool strictly perpendicular. After cutting, check the ends, if there are burrs, then carefully cut them off with a knife. |
 |
The ends of pipes and fittings are degreased. To do this, use a cloth soaked in a special compound or a damp alcohol wipe. It is important to carefully process the connected areas. |
 |
Welding depth marks are made on the parts to be joined. Marks are placed at a distance of 16 mm from the edge. Before making them, wait for the surface to dry after degreasing. Do not miss this nuance, in order to make reliable plumbing in the house, you must carefully follow the technology. |
 |
Elements are put on nozzles and heated. This should be done on a fully heated soldering iron (when the red light goes out). As for the heating time, if there is no indicator on the tool, the parts must be held for 7-8 seconds and immediately removed. |
 |
Elements connect. The pipe is inserted into the fitting, compressed tightly and held in this position for several seconds. In no case do not turn the pipe, this will reduce the reliability of the connection. When assembling the water supply with your own hands, look at the connections, they should get polypropylene rollers as in the photo, this is a sign of high-quality soldering. |
 |
Each branch is made separately. The assembly of the water supply system is carried out strictly according to the scheme. It is important to carefully connect each joint to ensure the reliability of the water supply. |
 |
Clips are attached. The pipe is gently shifted to the side, after which fasteners are installed along the line of its location. You can put fasteners in advance. Often, communications for the supply of water in a private house are hidden in, in this case, the strobes are made in advance. |
Do-it-yourself water is laid in the house in 2-3 days. The work is simple and you save a lot of money, because installation often costs almost as much as the materials.

Conclusion
Using the article as an instruction, you can draw up a project, purchase materials and lay plumbing in the house. The video in this article will help you understand the topic even better, and if something is not clear to you, ask your questions in the comments.
In a private house with water supply from its own well, well or from a central water supply, part of the pipes is always laid on the street - underground or through the air. More often - underground, but any pipes must be insulated, since winters in the territory of the Russian Federation always pass with negative temperatures, and the water in the pipes should not freeze even for a minute. Therefore, the problem of how to insulate a water pipe on the street always remains relevant, and everyone solves it in their own way. But there are many common points, the implementation of which will help to properly operate the water supply system in extreme conditions. And the main requirement for insulation materials that will be used for pipe insulation is low water absorption and high heat resistance.
In the ground, pipes made of metal or plastic are in contact with water and soil at the same time. The temperature of these materials will always be different, so condensation forms on the surface of the pipes. Due to the extreme operating conditions of the pipes, they must be made of a material that can withstand mechanical stress (ground pressure, stress during installation of the system), have a long service life, resist mold and corrosion. 
Types of heaters and methods of insulation of a private water supply
The most common and popular insulation materials for the plumbing system:
- Glass wool, basalt, stone, mineral wool:
- Glass wool is supplied for sale in rolls. It has a soft structure, thanks to which it is easy to isolate pipelines and pipe sections with a complex configuration: valves, gate valves, turns, branches. Glass wool is used to insulate pipes made of metal-plastic; in combination with glass wool, it is recommended to use roofing felt or fiberglass. Basalt wool is produced in cylindrical rolls - "shells", which are finished tapes 1 meter long. Cylinders are easily cut into pieces of the desired length; Some brands of basalt wool are made coated with aluminum. This coating protects the insulation from damage, extending its life.
- Styrofoam, expanded polystyrene:
- Expanded polystyrene is also produced in the "shell". Popular for its easy assembly and prefabricated shells that conform to the shapes of standard plumbing fittings with twists. Styrofoam blanks can be used many times. Due to the high flammability, the insulation material cannot be used in pipeline sections with high fire risks;
- Liquid heaters:
- Finely dispersed material, produced in the form of an aerosol, densely covers the surfaces of pipes of any complexity, fits the pipes with multiple uniform layers of high strength, and perfectly protects the surface of the water supply system from heat losses.
For the maximum effect of warming, it is necessary, when buying materials, to study all their properties and characteristics and tie them to the region and the conditions of the water supply system.
Insulation requirements.
The functional purpose of insulation is to protect the water supply from negative temperatures, and for optimal results, the insulation must comply with the declared characteristics, such as:
- Low thermal conductivity;
- Water-repellent characteristics of the material - to ensure the tightness of the layer;
- Antifungal and antiseptic indicators;
- Immunity to an aggressive environment, the influence of which can manifest itself locally on wandering sections of the pipeline;
- fire resistance;
- Long service life.
Glass wool, mineral wool and polystyrene foam
To insulate a pipe passing through the air, mineral wool or glass wool is used in rolls, which simplifies their installation and allows you to carry out the insulation yourself. The workability of these soft materials makes it possible to insulate the most difficult sections of the pipeline much more efficiently than when working with other heaters. Mineral wool can be tightly overlaid with any dimensional valve or gate valve, a pipe distribution angle or tee, a complex horizontal or vertical turn.

When buying mineral wool based on basalt fiber, you should immediately take care of the presence of special cylinders - “shells” - of certain sizes, for warming shaped parts. The length of such cylinders can be adjusted with a bench cutter or knife. They are also called "shells" in construction circles. The “shell” is often covered with aluminum foil or thin galvanized iron to protect the insulation layer from mechanical damage and improve heat retention around the pipe. Pipes for cold water are most often insulated with expanded polystyrene, since the combustibility of the material does not allow it to be used without restrictions in the insulation of hot water supply.

When working with mineral wool, it is necessary to use personal protective equipment - goggles, rubber gloves and a respirator, since cotton wool is made of small glass, basalt or other hard mineral fibers that will scatter during operation and can damage the skin, eyes, or get into the lungs person.
Installation of insulation cylinders
Mounting the "shell" insulation is simple - the required diameter of the "shell" is selected according to the diameter of the water pipe. Since the shell "consists of two halves, it remains to bury a section of the pipe on both sides, leaving 10-15 cm of open shell" to overlap it with the next cylinder. To improve the thermal insulation properties of the cylinders, a protective polyethylene film, metal or aluminum foil, roofing material or membrane heaters are applied to the shell. In any modern insulation material there are air bubbles that retain heat in the space between the pipes and the insulation.

Underground water heating
A water pipe passing under the ground or under the floor is also in most cases insulated with glass wool, which is wrapped around the pipe and fixed to it with wire or synthetic cord. If glass wool is used for insulation in the ground, the insulation layer should be protected with a waterproofing layer so that, under the pressure of the soil, the glass wool does not begin to compact and collapse.
Also, underground water pipes can be heated using a heating cable. Although the method is costly at a time, it works seasonally, so the savings are obvious.

You can turn on the heating cable only when the temperature outside drops to negative values. This method is also good in that it is possible not only to insulate a pipe with water passing under the floor, but also not to bury the pipes into the ground as deep as required by building codes - a ditch 0.5 m deep is enough. The cable for heating the water pipe is laid as inside the pipe, and outside - the effect will be equally positive. The only difference is in the fastening - outside the cable you can fix it yourself, and inside the pipe it is better to entrust the laying of the cable to specialists.
From the outside, the heating cable can be laid and fixed longitudinally or in a spiral. There are special calculations that calculate the distance between turns of wire and the total number of turns.
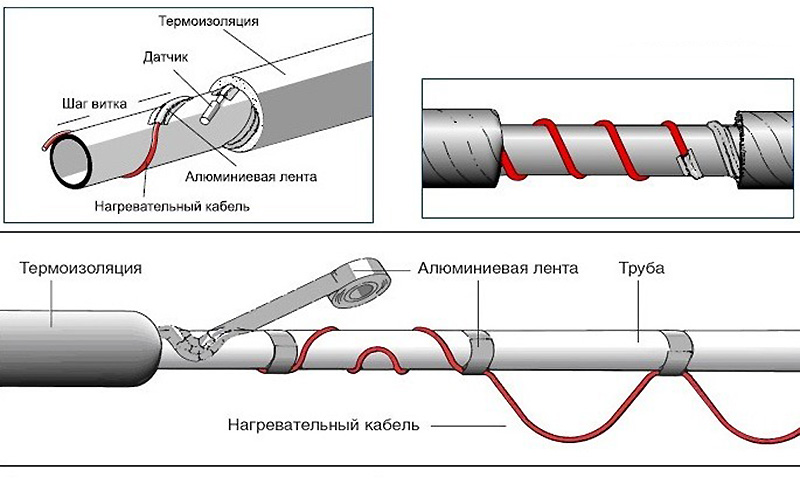
The complexity of this method of heating pipes also lies in the fact that it is necessary to install temperature sensors near the cable to control the temperature. But, despite the difficulties, this option of insulation is considered by experts not only to be the most effective and high-quality, but also the most reliable.
Having studied all the available methods of insulation and materials for the implementation of these methods, you can choose the most suitable water supply system for your operating conditions. When operating a cable for heating pipes with insulation, you can literally set the optimum temperature around the pipes within a day, even in the most severe cold. The disadvantage of this solution is the need to connect to the mains, so this option should not be the only one - it must be duplicated by other methods of insulation, for example, by deboning glass wool pipes.

How to lay and connect the heating wire:
- If the pipes are already laid in the ground, they must be dug out and the trench widened;
- Wind the cable around the pipe - in a spiral or longitudinal laying;
- Lay glass wool or other soft insulation on the wire, secure it with clamps or wire;
- Connect the cable to the voltage;
- Fill up the trench.
In this way, multilayer protection is equipped: electric heating wire, glass wool, soil protection.
Tapping into the city water supply network on your own, without the participation and approval of city services, is prohibited: the main networks are pressurized.
To ensure the authorized connection of drinking water from the city water supply network, it is necessary to perform a number of actions, following a certain procedure and the requirements of the law on water supply and sanitation.
 First of all, you should get a situational plan of the site with the application of all underground utilities. At the same time, the latest version is needed, which is available in the regional geodetic service - it is here that all surveys are handed over after the laying of the next section of underground networks. If the owner of a private house has such a plan, then it is important to make sure that it is suitable, and at the same time it is made on a scale of 1:500.
In addition to the situational plan, you will need to prepare:
- certificate of ownership of the site (or the right to use the land);
- application to the local water utility;
- technical conditions from the mountains. water utility.
The application is made in free form, with the following text:
« To connect a private house located at such and such an address to the city water supply network, I ask you to issue those. terms».
Often, the water utility company issues ready-made application forms. You need to address your application to the head of the water utility, sign, date and list the attachments, these are copies of the situational plan and the title document for the land.
You will need to fill out a questionnaire - a standard document in which the user indicates how many tenants permanently reside, what dignity. those. appliances will be installed. This will help specialists determine the normative water intake for this residential building. Vodokanal specialists will register the application and explain when to come for ready technical services. conditions.
What does the federal law on water supply and sanitation say?
Those. conditions, in accordance with the federal law on water supply and sanitation, contain instructions:
- regarding the amount of permitted water withdrawal for a given water user;
- the number of the well from which you can connect to the highway;
- turnaround time.
Then, an application should be sent to the district SES with a request to issue an opinion on connection to the city water supply network. Obtaining an opinion from SES specialists is a signal that the first stage has been completed.
Drawing up project documentation
 Designing the water supply of a residential building is a serious matter that people who are far from designing engineering networks should not undertake on their own. It is necessary to order a project to a specialized company that has the proper degree of accreditation, and most logically - to the project team of the same water utility. To the order, except for the situation, site plan and those. conditions, drawings of a residential building are also needed, and not only the plan of the first floor and basement, but also sections.
If you are far from designing engineering networks, order a project from a specialized company, and most logically, from the design team of a water utility.
The project consists of the following components:
- graphic part with an explanatory note;
- custom specification;
- estimates with a statement of resources.
If the owner of the mansion has a construction education, and the track is small, then it is quite possible to make a water supply project for a country house yourself:
- plan;
- longitudinal profile with detailing of the entry points into the building and adjoining to the existing well.
Particular attention should be paid to the technology of earthworks, highlighting the nodes of intersections with existing underground utilities, providing for their protection from damage. It is also necessary to draw up a bill of quantities.
It is important to understand what the slope should be, from what materials and what diameters it is best to take pipes, what shutoff valves should be used. With independent design of water supply systems, there will be no estimate. Project documentation is sent to the water utility for approval.
The finished project should also be registered with the SES, where the conclusion was previously issued. Now you can order a topographic survey, that is, a drawing of the area with specification of the distances between buildings, trees, fences up to the existing water well, from which water intake is allowed. The shooting is carried out by surveyors at a scale of 1:500, with the application of underground networks. Using this survey and the project, it is possible to fix the axis of the future route on the surface of the earth, earthworks will be carried out along this line.
Laying and connection works
 The next most important stage is earthworks, for which the Municipal Department receives an application - a form in 2 copies. to obtain a permit, and in the utilities, whose networks pass through the site, an order should be issued. Further, for earthworks, you need to contact a specialized company that has not only all permits for its activities, but also all the mechanisms that will be used. Such a company has gained experience in exactly how to organize and carry out such work: it will be necessary to call in place representatives of those city services whose communications fall into the zone of laying the water supply route, as well as comply with the requirements of external water supply networks, labor protection and safety.
If the length of the route is from a dozen or two meters, and at the same time the site is densely dotted
- underground pipelines,
- electrical cables,
- communication wires,
it is possible that the use of earth-moving equipment will be impossible. In this case, the work is carried out manually, in the presence of representatives of the relevant city services.
The finished trench should have the geometric parameters indicated in the project, and the walls of the house and the well should be bare, cleared of the ground and prepared for insertion. A tie-in into an existing water supply system is entitled to be performed only by employees of the water utility:
- they turn off the water supply to this well;
- connect the new pipeline to the main one, according to the water supply scheme of a private house.
The company that installs the pipe installs all design taps, plugs, valves, revisions, and other valves, as well as metering devices.
A tie-in into an existing water supply system is entitled to be performed only by employees of the water utility.
Now the network is almost ready, but specialists from the water utility operation service must accept the facility, checking it for compliance with the requirements of 416 FZ on water supply and sanitation, as well as SNiP, only after signing the act it will be possible to backfill the trench. The owner can already call a representative of the subscriber department to seal the meters.
Issue price
The cost of the entire complex for external water supply depends on many factors, including the following:
- track length;
- pipe material;
- laying depth - the volume of excavation depends on it;
- local rates, etc.
The order of the numbers is:
- water supply project - 5 thousand rubles;
- getting those. conditions - 4-5 thousand rubles;
- approvals - 12 thousand rubles;
- the cost of pipes, water meter, components - 5-10 thousand rubles.
- tie-in with a fee for connecting to the network - 15 - 50 thousand rubles;
- excavator work - 5-10 thousand rubles;
- network laying (in the complex) - 1.7 - 2.6 thousand per 1 pm.
Tariffs for water supply by region vary greatly, and in addition to the cost of the tie-in itself, they also charge a tariff rate for the length of the water supply network. Depending on the climate zone, it will also be necessary to provide for thermal insulation measures, and this applies to both entering the house and exiting the well, and the pipeline itself with water supply equipment. Backfilling of trenches is usually done with sand (partially or completely), and this is another plus to the total amount.
The issue price can be from 80 to 120 thousand rubles.
Samples and cost of documents
 In order for the local water supply network to be put into operation, it is necessary to prepare technical as-built documentation in accordance with the norms for water supply (external networks and structures). Such papers are prepared by engineering and technical staff of those companies that performed the work. Acts for hidden work are a special type of primary executive documents that certify each operation, each layer, which, when the next technological construction work is performed, will cease to be visible, that is, become hidden.
For acts of hidden work, there is a special form of forms where you need to enter the necessary information. The act of covert work on the excerpt of the trench should include information on how the excerpt was carried out - mechanized or manual, what soils the earth is represented by. It is necessary to indicate the parameters of the trench, if there are intersections, describe with which particular communications there was an intersection, what measures were taken to protect them.
The act of covert work on sand filling gives an idea of the thickness of the bedding layer, which is important: sand is a bed for the pipeline. It is also important to demand such acts for hidden work on sp water supply:
- pipeline laying;
- hydraulic testing of the pipeline;
- backfilling the pipe with sand;
- backfilling of trenches.
In addition to these documents, the contractors are required to provide the customer with:
- executive survey of the water supply system - a scheme of water supply and sanitation;
- certificate for the installation of a metering device - a water meter.
But that's not all: the SES service must flush the system and disinfect it, and then check the quality of the water by taking samples. Having issued a special act, the SES gives a signal to supply water to a private house. The presence of an act from the SES on washing and disinfection is a necessary attribute in the package of documents for supplying water to a private house.
The presence of an act from the SES on washing and disinfection is a necessary attribute in the package of documents for supplying water to a private house.
All these papers upon completion of work must be submitted to the city water supply metering service for technical examination for compliance with the project and all standards. After this procedure, a certificate of execution of those will be issued. conditions. To be able to supply water, it is necessary that the user's relationship with the water utility for the operation of the water supply system of a private house be formalized. In the office of the municipal enterprise for water there are standard contracts, the owner of the house with a passport and a full package of papers goes there and signs a prepared contract for those. supervision in 2 copies.
Conducting water to a private house, crashing into the central water supply - the procedure is not particularly complicated, but associated with the execution of a large number of all sorts of documents. In order for everything to be done quickly and in compliance with the requirements of the federal law on water supply and sanitation, a specialized company with considerable experience and all permits should be involved in the performance of work.
The video tells the main points about connecting to the water supply and sewerage:
Do-it-yourself plumbing in a private house can be carried out from a central water supply or from a well (well). The principles of its creation, the main components of the system in each of these cases do not actually differ.
Choosing a wiring diagram
There are two ways to supply water to consumption points, and the choice of a do-it-yourself water distribution scheme in a private house depends on the parameters of the system, as well as on the intensity of water consumption (permanent or periodic residence, number of residents, etc.).
serial connection
This connection is also called tee. Faucet, shower and other points are connected in series. This method requires the use of fewer materials (pipes, fittings, etc.), therefore it is cheaper.
The disadvantage of a serial connection when distributing a water supply system is the likelihood of a decrease in pressure at the most remote points with the simultaneous use of several water intake points.
collector connection
Collector (or parallel) the connection is the organization of the collector (or two collectors - hot and cold water supply), to which the lines leading to each water intake point are connected. To implement such a scheme, more pipes will be required, but its principle of operation allows for stable pressure.
There are additional nuances when choosing the principle of water supply. Do-it-yourself installation of a water supply system in a private house can be done in two ways:
- "Deaf" lines ending in a dead end (stub). Such a plumbing scheme in the house is more economical, however, when hot water is supplied, it can create some inconvenience - when opening the tap, you must wait a certain time until the liquid reaches the plug, and only after that hot water will appear in the tap.
- Circulating closed lines more practical and more convenient, however, the implementation of such a project will require not only more pipes, but also a special circulation pump.
Experts recognize the most rational combined option, in which the "blind" distribution of cold water is combined with a hot water circulation line.
The main nodes of the scheme
The water distribution scheme in a private house, more precisely, that part of it that is responsible for supplying water to the house, consists of the following main components:
- pumping unit for a well or well,
- nipple (adapter),
- preventing reverse,
- pipeline,
- filtration equipment (one or more different filters depending on water quality),
- stop valve,
- pyaternik (fitting) for connecting the main elements and devices (pressure gauge, pipes).

The sequence of the water supply scheme
In order to visualize how water is distributed in a private house with your own hands, you can consider the course of communications from the source to the end point.
1. An individual water unit (well or well) is equipped with pumping equipment, the choice of which is carried out according to the following principles:
- for deep artesian wells, only submersible pumps can be used,
- for narrow channels and casing pipes - only surface units, including pumping stations,
- in other cases, the choice between submersible and outdoor equipment is made depending on the technical characteristics of specific models and operating conditions.
2. The pipeline that brings water to the house is usually laid underground. The depth of the trench is usually chosen taking into account the depth of soil freezing in a given region. As an additional protection against freezing, communications are supplied with a heat-insulating layer.
 Conducting plumbing to the house from
 3. The entry point of the pipeline into the house deserves special attention.
- Firstly, the hole for the pipe is made with a large margin - a gap of at least 150 mm on all sides. This avoids deformation and destruction of communications if, over time, the wall begins to sag or deform.
- Secondly, a small section of the pipe, located between underground and protected ground communications and internal wiring in a warm room, is in the open air. In this place, the risk of freezing of the pipeline is highest, so good thermal insulation is required.
4. The hydraulic accumulator and control devices are usually installed in the basement, basement or on the first floor near the entry point of the pipeline into the house. Purely technically, it would be more correct to place such equipment at the highest point, however, from the point of view of practicality and ease of use, the lower levels are more suitable. It should only take into account the need to raise water to the upper floors at.
The hydraulic accumulator is designed to stabilize the pressure in communications and prevent frequent switching on (and, accordingly, rapid wear) of pumping equipment.
The control and monitoring unit includes a pressure gauge, pressure switch and, which prevents the capture of air and the formation of air locks in the system when the water level in the well or well decreases.
5. Filter systems are completed, depending on the need, with devices for:
- preliminary rough removal of large particles of impurities (more about),
- fine cleaning,
- water softening.
After that, the plumbing is done in a private house with your own hands according to the chosen scheme. For a collector circuit, it might look like this:
- Immediately after the accumulator is a tee along with a stopcock. The tee divides the flow of water into two directions - to the house and for other needs (watering, washing the car, etc.);
- A deep filter is connected;
- Next comes the tee, from which the distribution of water pipes in a private house is divided into a pipe for cold water, which immediately goes to the cold water collector, and a pipe through which water will go to a boiler or another for heating. After heating, the water is sent to the hot water collector.
 In the photo, the water distribution scheme in a private house
 Important: When installing water supply in a private house with your own hands according to the collector scheme, it is necessary to install shut-off valves at each point of water consumption.
Pipe selection
Communications diameter
When conducting a water supply system to a private house with your own hands, the right one will ensure economy at the stage of installing the system, as well as avoid unpleasant noise when water moves through communications.
To calculate the parameters of lines supplying water to consumption points, the starting point is total length of each line:
- for a branch with a length of less than 10 meters, pipes with a diameter of 16-20 mm can be used,
- for branches about 30 meters - with a diameter of 25 mm,
- for the longest lines over 30 meters, pipes with a maximum diameter of 32 mm are required.
Important: Particular attention should be paid to the choice of the diameter of the collector pipe. Insufficient value can cause malfunctions in the system.
The distribution of water in a private house from the collector is calculated based on the fact that each tap has a throughput of about 5 liters per minute. After that, it is roughly calculated how much water is taken simultaneously from all points at peak moments and the diameter of the collector is selected:
- 25 mm for a flow rate of 30 l/min,
- 32 mm for 50 l,
- 38 mm for 75 l.
Pipe material
Laying a water pipe in a private house allows the use of pipes made of various materials, each of which has its own advantages, disadvantages and operating features.
 .
.
In order for the system to work flawlessly, it is important to know how to conduct plumbing in a private house with your own hands correctly. This concept can include both the basic principles regulated by building codes and regulations, as well as some of the nuances and subtleties known to experienced craftsmen.
- Ideally, the pipeline should not pass through building structures, however, in practice, the creation of such a scheme is often impossible or impractical. If it is necessary to conduct communications through the wall, the pipe must be placed in a protective glass.
- Despite the fact that the owner of the house almost always wants to get the maximum free space and for this "press" the pipeline from the wall, there must be a gap of at least 25 mm between the building structures and the communications running parallel to them for easy repair work. The contour of the inner corner requires a distance of 40 mm, and the outer 15 mm.
- If there are drain valves on the pipelines or the hydraulic accumulator, a slight slope is made in their direction.
- The most convenient way to fix the pipeline to the walls is with special clips. You can choose single or double devices, the distance between them in any case should be about 2 meters.
When deciding how to make water distribution in a private house, remember that a well-executed internal water supply system has characteristic differences:
- Minimum joints and adapters. This improves the reliability and efficiency of the system.
- All connections are made in strict accordance with the installation technology of this particular type of pipe.
- The presence of valves or shut-off valves in critical areas of the system and at connection points.
- The minimum number of not too reliable flexible sections for connection (hose connections), which are most vulnerable to pressure drops.