Album for coins with your own hands: two workshops on making an album (method using a soldering iron and using a sewing machine).
Any numismatist can make an album for coins with his own hands. It takes a lot of space to store a lot of coins. The master class presented in this article will teach you how to make a beautiful and roomy album.
Varieties for numismatists
Albums with coins are sold in special shops for numismatists. There are many varieties of albums, but most often sellers offer buyers separate special sheets with special money holes of different sizes. There is a special place for a signature. Such albums have a very high price, so not every collector can afford this luxury, it is easier to make an album on your own.


There are 2 ways to make a coin album. In our material, both methods will be described in detail.
First option
Materials and tools for the product:
- Folder made of cardboard with a binder, or on rings;
- A4 thick paper sheets;
- Dense and transparent stationery files;
- Marker;
- Ruler;
- soldering iron;
- Two clerical knives - narrow and regular.

First you need to make a paper diagram. Take a sheet of A4 paper and draw a stencil grid, where each cell will contain a coin. The size of the cells should be slightly larger than the size of the cells in the collection.
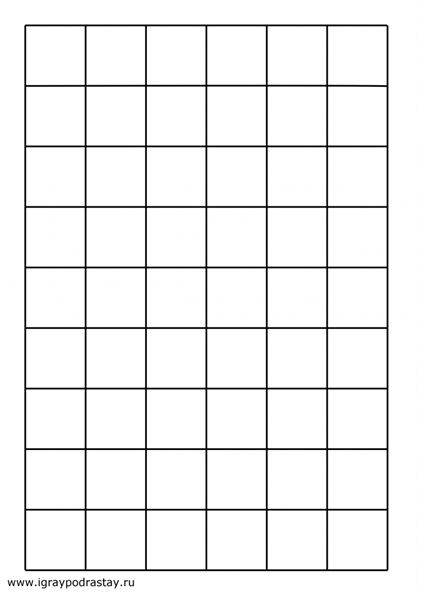
At the next stage, carefully fix the diagram under the stationery file with tape. Now heat the soldering iron and gently circle each cell with a sting over the office. Under the action of high temperature, the contour on the polyethylene will melt.
Pay special attention to this moment! When working with a soldering iron, there should be no through holes.
Cut off the top of the cell with a utility knife. It is important to start the incision from the inside out. There will be money holes. Clean the coins with citric acid and place in capsules. Seal the holes on the back with tape.

Second way
This method is much simpler than the first, because in the process you can do without a soldering iron.

It is necessary to prepare such materials and tools:
- Folder with rings;
- Plastic and transparent folders in A4 format;
- felt-tip pens;
- Stationery ruler;
- Sewing machine;
- 2 types of stationery knives - narrow and regular.
Beginning of work:
- Draw a template with a ruler and marker. Draw a stencil on a paper sheet in the form of a grid. One coin is filled into a capsule. Cells should be 2 times larger than collectible coins.

- With adhesive tape, the stencil is fixed under the plastic folder. Transfer all lines to the plastic base.
- Sew the seams along the lines with a sewing machine.
- With a sharp clerical knife, cut off the top edge of the cell along the line. The cuts start from the wrong side.
- Clean the coins with a cleaning agent and put in capsules.
- Seal the reverse side of the cells with adhesive tape.
Album for numismatists is ready!
Collecting coins is a very exciting and interesting activity that greatly develops horizons and accuracy. You can store these coins in special albums, which are sold in abundance in numesmatic stores. And you can use boxes for this, which, for example, come with fountain pens.
DIY coin collecting box
So, you are already writing with the pen you were given, and the box from it lies in the far corner? Then it's time to get to work. Select the set of coins that you want to store in a homemade case. Now you should pick up modern coins of similar size.

This must be done in order not to spoil the real masterpieces of numesmatics, which you probably possess. For this, 1, 2x, 5, 10 ruble coins, as well as all penny coins, are perfect.

There are two options for surface preparation. Because it is not enough just to put coins in a box - they will naturally fly off and mix. It all depends on what material the box is made of. Option one: fix the coin in the pliers and glow it on gas. Then put it in the place where the original coin should be stored.

A hot billet will leave a hole in the melted surface, into which, for example, cents or francs will fit well.
Option two: if the surface does not melt, then simply circle the coin along the contour and cut out the necessary recess with a sharp knife.

Thus, you can store especially valuable and commemorative coins in your collection. I do exactly that. By the way, not only boxes from fountain pens are suitable for these purposes, but also others in which the inner surface is made of soft material.

Collecting any things: coins, badges, medals is a very exciting hobby that can even bring you profit in the distant future. (Maybe not far away.) Therefore, the issue of storage of the collection should be given special attention.
Numismatics (collecting coins and banknotes) is still one of the most popular hobbies. Someone simply collects commemorative ten-ruble coins, someone brings new copies from travels and business trips. Experienced numismatists even buy rare coins on purpose, trying to replenish their collection with rare items. In any case, sooner or later the question arises: how to store all this wealth? In this article, we will show you how to make an album for coins quickly and easily with your own hands.
We are trying to create an album for coins with our own hands
In specialized stores you can find a variety of albums. Most often, it is offered to buy separate transparent sheets with slots for coins of different diameters or banknotes, with or without a place for signatures. However, this is not a cheap pleasure, and if you are not sure that numismatics is your hobby for life, or just want to save a little money, then the best option is to make an album yourself.
To make an album for coins you will need:- ring folder (you can use any other cardboard folder, for example, with a binder, but the “ring” option looks much neater)
- sheets of A4 paper
- transparent stationery files (it is better to choose dense ones)
- felt-tip pen
- ruler
- soldering iron
- narrow stationery tape
- stationery knife
1) We start our master class by preparing a paper template. On a sheet of A4 paper, using a ruler and a felt-tip pen, you need to draw a stencil, which is a mesh cell. Each of the cells will contain one coin (in this case, different cells can be of different sizes, depending on the instances in your collection). It is important to remember that the size of each cell should be slightly larger than the size of the coin that is planned to be placed there.

2) Carefully attach the finished stencil under the stationery file using adhesive tape.
3) Heat the soldering iron and carefully circle each of the cells along the contour - polyethylene should stick together at the heating points, but no through holes should be obtained. If this is your first time working with a soldering iron and you are feeling insecure, it is best to practice on a draft file.

7) So our album for coins is ready - we have made a convenient storage for all copies of the collection.
As you can see, almost no complicated tools are required to make an album for coins in the above way, with the exception, perhaps, of a soldering iron. Is it possible to do without it? Of course, there is another way.
To make an album for coins (method number 2) you will need:- ring binder (you can also use a binder binder, but the ring binder looks much neater)
- A4 transparent plastic folders
- felt-tip pen
- ruler
- sewing machine (if you don’t have one, you can use an awl and thread with a needle, but in this case the process will take much longer)
- narrow stationery tape
- stationery knife
1) As in the first case, we first make a paper template. On a sheet of A4 paper, using a ruler and a felt-tip pen, you need to draw a stencil, which is a mesh cell. The capsules will contain one coin each (in this case, different cells may be of different sizes, depending on the instances in your collection). It is important to remember that the size of each cell should be slightly larger than the size of the coin that is planned to be placed there.

2) Carefully attach the finished stencil under the plastic folder with adhesive tape and transfer the outlined lines to the plastic.
3) With the help of a sewing machine, we sew seams along the marked lines. If the sewing machine is not available or cannot cope with hard plastic, you can try to sew the cells manually.
4) Take a clerical knife (it should be sharp enough) and cut each cell along the top edge along the ruler. You need to cut from the back side of the file, carefully making sure that the knife does not cut through the front side. We got slots in which you need to put coins.
5) We put coins in the slots. Please note that moments must be thoroughly cleaned with citric acid or a special factory cleaner before being placed in the album.
6) Carefully seal the slots on the reverse side of the files with tape.
7) The album for coins, made without a soldering iron, is ready!

Video on the topic of the article
For more clarity, we suggest watching the following videos, which demonstrate in detail how to make an album for coins.
Album for coins in capsules. DIY October 10th, 2012
Here is an album you can make with your own hands from improvised materials: 


Tools and accessories that I used.
(If you have punches or have the opportunity to make them, then the task is easier for you :)
1
. metal rail (guide for the circular knife (2) and with the help of the same rail, after heating with an iron, I squeeze even folds on the cover - the film melts, takes the desired shape, see photo [I had this thing :)]
2
. circular knife for cutting cardboard
[sold at the hardware store as a linoleum cutter]
3
. Circular knife OLFA OL-CMP-1 for cutting round holes
[sold in stores: modeling, some household and for artists and designers]
(If you have punches or have the ability to make them, then the task is easier :)
4
. An ordinary clerical knife (I cut off a self-adhesive film with it)
5
. A hammer
6
. Glue "Moment" for gluing cardboard
7
. Semicircular file, medium roughness (I process, align the edges of the holes after cutting with a circular knife)
8
. Accessories: corners and bolts (ordered on the internet at BASK +)
9
. Pencil
10
. Acrylic paint "gold" (I paint all open areas of cardboard with it) [can be bought in goods for artists)
11
. Cotton swab, I apply paint to it
12
. Clamp (I clamp the rail (1) with it when cutting cardboard)
13
. Punch 5 mm (I punch holes for bolts and for the "eye" for easy removal of the capsule, see photo above)
14
. German thick films under the skin (d-c-fix, Klebert. In the album 1812 he used black and red leather d-c-fix. (Earlier he used vinyl leather for the cover, but it's hard to work with).
[Self-adhesive films should be looked for in departments with wallpaper, although sellers of Chinese consumer goods like to sell - such a film will not work]
15
. Ruler 
The album is made of 2.5 mm thick binding board, which can be purchased at artists' stores. Usually sold in sheets of 900x700.
Now in detail on the manufacture of the sheet:


Cover making details:


After you have made the cover, you can install the corners (23x4.0 yellow)