Optimal cage sizes for rabbits: drawings. Dimensions of industrial cages for rabbits
Many livestock farms and private entrepreneurs are increasingly paying attention to rabbit breeding. Breeding these furry animals is quite a profitable business. So to speak, it is practically waste-free, since rabbit droppings are highly valued in agriculture as fertilizer.
Types of cages for rabbits

The single-section version of the cage is a spacious enclosure with doors, equipped with drinkers and feeders. The room is designed for one individual or, if the section is large, for walking young animals. A single-section rabbit cage is convenient for breeding animals in small quantities for your own needs.
Did you know? Rabbits are considered silent, but these animals often use various sounds to explain their condition. A contented, peaceful rabbit makes purring sounds, pleasure can be indicated by short clicks, aggression can be signaled by growling or grunting, fear can be indicated by chattering teeth, and if the fluffy one screams, it means he is in pain.
 The cages, consisting of two sections, are separated by a V-shaped mesh feeder. In such a rabbit house you can keep a couple of animals by opening the flap between the sections when mating is planned.
 The cages, consisting of three sections, allow you to keep three individuals (a male and two females); between the sections there are opening flaps. If necessary, one of the females can be allowed in to the male living in the central section. After communication& - divide again.
Cage type state farm "Klenovo - Chegodaevo"
The design of these cages is 240 cm long and 65 cm wide. The material for making the floor in such cages is wood, in a solid sheet or in a slatted manner. Feeders and drinkers are located inside the cages on the floor. There are insert boxes that are used as queen cells with removable feeders and bowls for babies.
Important! Little rabbits are gradually accustomed to adult food. The kids are grated carrots, steamed grain and given fine soft hay.
The convenient design of a two-tier mini-farm was developed and implemented by I. N. Mikhailov. There are two floors of cages on the frame-stand. The roof is made of translucent materials.
The installation of feeders and drinking bowls makes it possible to provide animals with food and water for a week. This arrangement of two-tier cages for rabbits is convenient for those who cannot devote time to animals every day. 
Cells designed by Zolotukhin
Zolotukhin’s design is a three-tier enclosure, two sections per tier. The upper tiers are shifted to the width of the grid of the lower floor obliquely, a kind of protrusion of the floor made of plywood or a flat sheet of slate.
A stationary queen cell is not provided: For a female with offspring, a portable hole is inserted for the winter. In the summer, the female with the rabbits is located in the hay, but is separated from the rest of the animals by a partition.
The feeder in the form of a tray is inserted into the door frame, which allows you to pour food without opening the door.
Does it make sense to purchase an industrial cage?
For large-scale rabbit breeding, factory-produced rabbit cages will save time on making cages yourself. Such cages have many advantages: a clear design, equipped with convenient drinkers and feeders, trays for feces, nests for individual individuals.
The factory nets provide convenient queen cells for females with offspring. Drawings of rabbit cages are constantly being improved, designs are supplemented with innovative ideas, more convenient and rational designs are being invented for both the cages themselves and various devices for the life of animals.
 The lack of factory cages in the frequent defects in the production of any parts of the house, the discrepancy between the size of the cage and its future location.
On the other hand, when making a cage for domestic rabbits yourself, the size of the cages is proportional to the space of their further location. Depending on the number of animals, the type of cage and the placement of partitions, drinkers, and feeders are selected.
It is possible to choose a material that is more convenient for you when making both the entire cage and the tray, feeders and other things.
Making your own cage
Before making housing for animals, you need to decide on the size of the premises: for adult males, females and cubs, for each individual rabbit the footage necessary for normal development and maximum comfort is determined.
Professionals advise calculating the area of a flock for rabbits so that there is at least 0.12 square meters per adult. It is advisable to immediately provide for all the nuances: partitions, location of drinkers and feeders, location of pallets.
Three-tier cages for rabbits will be optimal for a large number of animals; the project drawings can easily fit both a nursery for young animals and separate sections for males and females.
The advantage of such sheds is significant space savings and the ability to install the structure on the street or in a utility room.
Interesting!Newborn rabbits are naked and blind, and already on the twentieth day of life they can feed on their own.
Choosing a location for cells
It doesn’t matter what design you have in mind: small cages for rabbits or three-tier sheds, the main thing is correct choice of location.
The best place for an aviary would be a slightly shaded area, for example, in a garden among trees. In this case, the animals will be protected from drafts and overheating.
 Professional rabbit breeders advise keeping furry pets in outdoor conditions: the animals develop immunity to diseases, the quality of the coat improves, as well as the reproductive function and endurance of the offspring.
A good option is against the wall of a large utility room with a protruding canopy, which will create additional protection from precipitation and direct rays of the sun. When kept outdoors, take care to insulate the cages in winter.
Two-story cages for rabbits can also be located indoors. In this case, carefully consider the removal of waste products: animals should not suffocate from the smell of their own feces.
Size and drawing
The dimensions of the proposed premises depend on the breed of animals and their number (take into account the offspring). The average premises have the following dimensions:
- length– 120-150 cm;
- width– 60-80 cm;
- wall height– 35-50 cm.
 When developing a drawing, take into account houses for females with offspring and rooms for young animals, think about the location of feeders and drinkers, convenience for you when cleaning cages, partitions that open for mating.
Think about how to insulate an outdoor space for animals. You might like the idea of adding a mesh aviary to the main house.
Required tools and materials
To build cells, it is better to use natural materials for the main parts of the room: wooden blocks, boards and slats, plywood sheets.
For the roof of the houses, it is advisable to use a slate base rather than metal. Metal sheets heat up quickly, as well as freeze in winter.
For individual parts you will need: galvanized mesh, door hinges, hooks and latches for doors. Tools and small parts:
- metal scissors;
- screws and screwdriver;
- nails and hammer;
- pliers;
- grinder, saw;
- tape measure, pencil and level.
Attention! The design of outdoor cages must be reliable against the penetration of predators: foxes, dogs or rats.
Building a cell: step-by-step instructions
 Once you have decided on the dimensions, selected the necessary materials and prepared the tools, you can begin construction. To make your work easier, consider what is offered to you
This is especially true for livestock fed for slaughter. To create the most comfortable conditions for an animal to gain weight, it is necessary to provide comfortable, practical and easy-to-maintain cages. Of course, you can buy them ready-made, but it is much more profitable from an economic point of view to make them yourself. Let's try to figure out how to make cages for fattening rabbits with our own hands from scrap materials.
It is not recommended to make the bottom of a cage for permanent residence from mesh, since animals’ paws often hurt on it. But young animals for fattening will not be in such cages for more than 3 months, so you can safely assemble a structure from a mesh. The main thing is that the wire from which it is made is galvanized. Otherwise, the metal will rust very quickly due to constant contact with urine.
The size of the grid cells should also be given special attention. The cells should be large enough so that droppings and other waste can easily fall through them. But at the same time, rabbits’ paws should not fall into them. Ideal cell sizes: 18x18 mm, 20x20 mm or 16x48 mm.
Meshes with larger cells are not worth taking even for giants. The animal will simply not be comfortable and will stop gaining weight. As a rule, a large number of rabbits are left for slaughter, so let’s consider an example of a fattening dormitory with three floors, two rows on each.
Tools and materials
To start working on the feedlot you need to have:
- wooden beam;
- nails;
- mesh and metal rivets for it;
- sheets of tin for waste disposal;
- hinges and latches for doors.
The tools we will need are:
- hammer;
- pliers;
- hacksaw;
- file;
- screwdriver for screwing hinges and latches.
Depending on the size of the cells and the height of the cell above the ground, it is necessary to calculate the amount of materials. The drawing below shows our future cage with dimensions.

Rabbit breeding is one of the most profitable areas of livestock farming. Rabbits are quite unpretentious, reproduce quickly and grow well. The only thing the owner must do is to provide the animals with a good home. In a properly designed cage, rabbits will reproduce faster and become less sick.
A cage for rabbits can be bought ready-made - today there are many different designs from any materials. But it’s much cheaper to make a cage yourself. In addition, this will allow you to economically distribute the space allocated for the rabbitry, select the most suitable type of structure and, if necessary, modernize it. Learn more about how to make a rabbit cage at home with video and photos in this article.
What determines the choice of cell design?
The rabbit needs enough space, and the choice of design for the cage should be based on this factor. When starting to breed rabbits, it is necessary to build at least 3 types of rabbit hutches:
- for males;
- for pregnant females;
- for breeding young animals.
The main type of cages are structures for fattening young rabbits.
There are 3 different types of rabbit hutches:
- on open air;
- in the barn;
- portable structures.
If rabbit cages are installed outdoors, you need to choose a shaded place on the site that will be protected from wind and drafts. The location should be such that the rabbits are warmer in winter and cooler in summer.
If the rabbitry is installed in a barn, the roof on it can be made of mesh, because there is no need for protection from precipitation. A house with a walk is considered an ideal option (shown in the photo below).
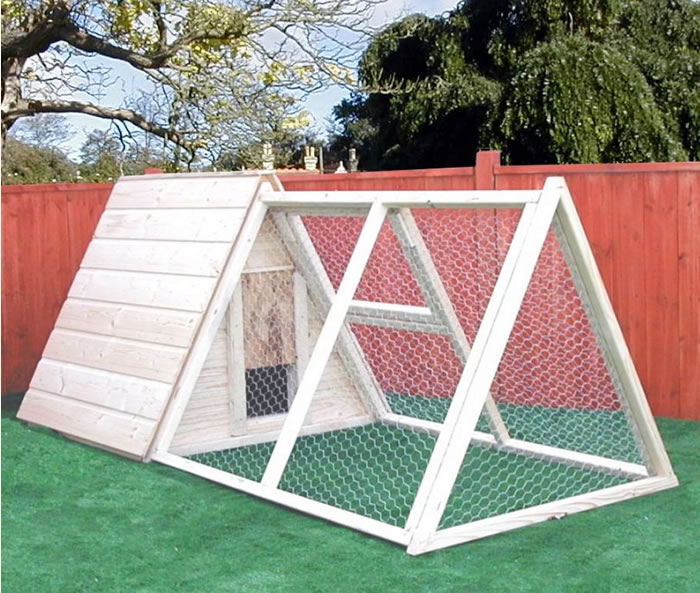
For this design, the back wall of the cage is made mobile; if necessary, the latch is opened, and the rabbits can go out for a walk. The walking area is fenced with a net and wooden blocks. This allows animals to eat pasture. When the grass in the fence is completely eaten, the rabbitry is moved to another place.
Attention! The length of the cage should be at least one meter; for rabbits of large breeds it should be increased to 1.5-2 meters. The width is at least 60 cm, and the standard height is 50 cm. At the same time, the back wall should be 5-10 cm lower than the front to form a slope.
How to choose material for a rabbitry
The main requirement for the material from which the rabbit cage will be made is safety. The material must be non-toxic and non-traumatic. Rabbits love to chew on everything, they should not be poisoned or injured by parts of the cage.
The most popular materials for rabbit hutches are wood and metal mesh. The mesh cell should be no less than 1.7x1.7 cm, but no more than 2x2 cm. Rabbits' paws should not fall into the mesh, as this could cause the animal to be injured and break a limb.
You should not buy wood from expensive construction stores; rabbit houses do not require high-quality material. A rough-cut board or timber, which can be purchased on the market at a low price, is quite sufficient.
Important! All protruding fragments must be cleaned with sandpaper so that the rabbits do not injure themselves on the wood.
You also need to pay close attention to the fasteners and the edges of the mesh - there should be no sharp objects inside the rabbitry.
Common cell designs
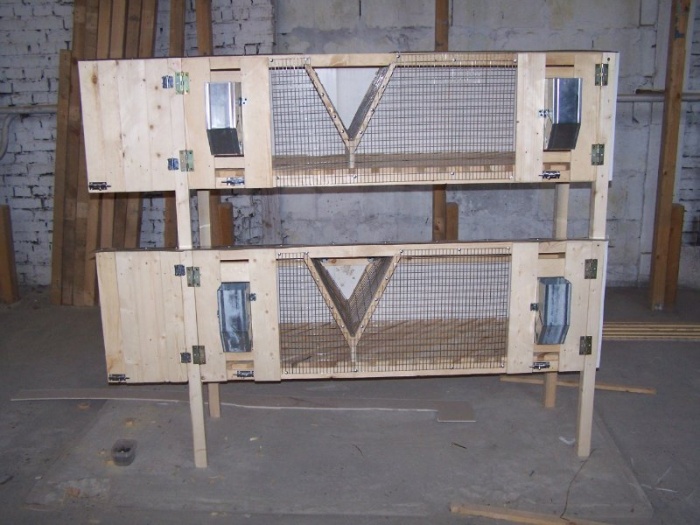
Most often, a standard cage design is used, divided into two sections. In such a “house” two rabbits live at the same time: these can be two males or pregnant females (photo below).
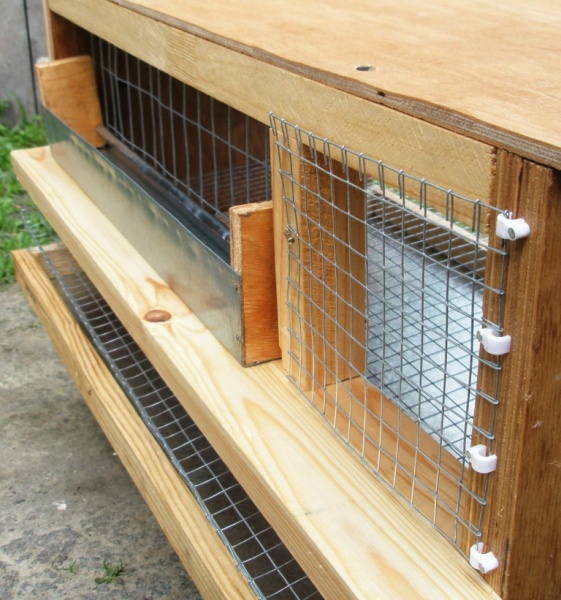
The essence of this design is that in one building and under one roof a cage of two “rooms” is built, separated from each other by a nursery or a partition. A manger is a feeder for hay or grass; it is most often made of mesh in the shape of the letter V. Feeders for dry food and drinking bowls are attached to the sides of the rabbitry. Each of the two compartments has its own door made of metal mesh.
The bottom of the cage can be made from the same mesh or wooden slats can be used for this. Slats are more preferable, since it is more comfortable for rabbits to sit on them, and in cold weather their paws will not freeze to the floor. But rabbits can damage wood with their teeth, so a metal floor will be more durable.
In order to effectively remove manure from a rabbitry, two methods are used:
- A tray made of plywood, boards or plexiglass that is installed under the cage floor. To clean the cage, the tray is simply pulled out along the guides.
- Bunker made of galvanized metal or wood. It is installed below the floor level of the cage so that waste flows into a container installed under the cage (shown in the photo below).
Such a two-section cage can be covered with a removable roof, then it will be easier to clean the inside of the “house”. If the cage is installed outdoors, it is covered with roofing material (slate or tiles).
Attention! It is not recommended to use metal for roof construction, since in the summer it will heat up in the sun, which will lead to overheating of the rabbits.
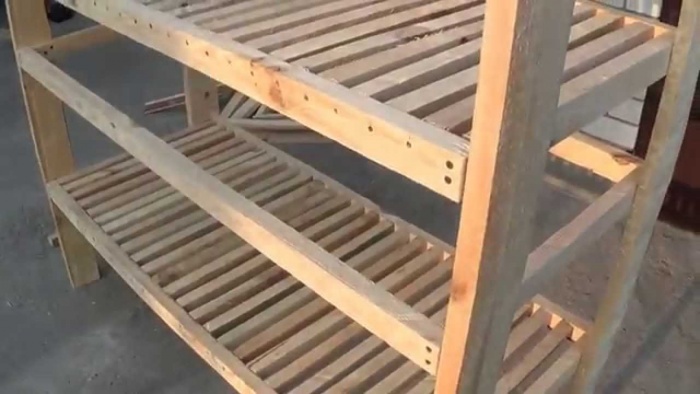
If the owner dreams of breeding a large number of rabbits, a large area is needed for the construction of cages. To save space on the site, the cages are made in two tiers. Three-story structures are no less common. The cage frame, in multi-story construction, must be strong enough to support the weight of the entire structure and animals.
Making a three-story cage requires a special pallet design. In this case, it will not be possible to use the bunker method due to lack of space, and pull-out trays are not very convenient, because the height of the cage will be significant.

For a rabbit “house” of three floors, it is more convenient to use inclined pallets. Each of them is located at a slight angle to one of the sides of the cell. All waste and manure will flow down pallets from the top tier to the bottom, eventually ending up in the waste receptacle.
Arrangement of the feed compartment and nesting
Each cage should have a place for eating and walking, and a separate area for sleeping and resting. Therefore, the free space of the compartment must be divided by a partition. A hole measuring 20x20 cm is cut out of a sheet of plywood or a board made of boards, making it at a height of 10-15 cm from the floor level (a similar design is shown in the photo).
The feeding and nesting compartments must have their own doors: mesh for the feeding compartment and solid for the nesting compartment. Through two doors it will be more convenient to get the rabbits out and clean the cage, because its length often exceeds 1.5 meters.
The nesting compartment should not be too large; the rabbits should feel warm and comfortable here. The parameters 30x60x50 are quite sufficient, that is, it is necessary to separate about 30 cm of the width of the cage with plywood or boards. You can make a separate roof over the nest or arrange it under a common roof.
Arrangement of queen cells
In cages containing pregnant or lactating females, queen cells must be installed. They can be mobile and installed as needed, or stationary.

The floors in the queen cell should be solid, the dimensions of this “house” made of boards or plywood are as follows - 30x30 cm, height - about 20 cm. It is not necessary to make a roof in the queen cell, but with a roof the kids will be much warmer in the winter.
Important! Among experienced rabbit breeders, there is a version that there is no need to build queen cells at all - the female herself will choose a place convenient for herself and build a nest.
Insulation of the rabbitry
In regions with cold winters, it is better to move cages with rabbits to barns. If this is not possible, the “houses” must be insulated. To do this, the walls, floor and ceiling are made double, and the void is filled with insulating material:
- mineral wool;
- polystyrene foam;
- straw.
To prevent the insulation from getting wet, it can be placed in plastic film, the edges of which are sealed.
In the northern regions, queen cells need additional insulation, because newborn rabbits can quickly freeze and die. The bottom of the queen cell is made double, and a medical electric heating pad or a small fragment of a “warm floor” is placed in the cavity.
Attention! It is very important to hide electrical wiring from rabbits, they can easily chew it.
Instructions for collecting the cage
You should start assembling your rabbitry by studying the project. Having familiarized yourself with the dimensions and understood the design, you can proceed to assembly:
- First of all, assemble the cage frame. It is most often made from wooden blocks measuring 50x50 mm. The assembled frame is installed in the place where the rabbitry will be located.
- The floor is made by attaching a mesh or wooden planks to the bottom, which are filled in increments of 1.5 cm.
- A pallet for collecting waste is made according to the design laid down in the project.
- Now you need to mount the walls and partitions. For the back and side walls, solid sheets of plywood or knocked down boards are most often used. It is necessary to ensure that the fasteners do not protrude into the cage.
- The front wall is made of mesh. First, knock down a wooden frame from bars, and then use nails or screws to attach the mesh to it.
- Performed in the front wall of the door using awnings and installing locks.
- The front wall is attached to the main part of the cage.
- They install mangers for hay, partitions, nests, queen cells, feeders and drinkers inside the rabbitry - all parts must be fixed and stationary so that rabbits cannot move them.
- The roof is being installed.
Making a rabbit cage with your own hands is not difficult at all. This approach will help save space and position the rabbitry in the most convenient way.
Cages with two or three floors significantly save space, and they are also easier and faster to maintain. A self-made rabbitry can be easily modified, if necessary, converted into a compartment for young animals or added another floor. If rabbits feel comfortable in their new “home”, they will grow faster, reproduce better and get sick less.
Reading time ≈ 11 minutes
One of the important components of successfully keeping rabbits is providing the animals with suitable housing - cages. Cages are very convenient for breeding animals - they are the easiest place to feed, care for, house and, if necessary, treat the animals. At the same time, do not rush to buy industrial copies - you can make the cages yourself. We will look at how to build cages for rabbits with our own hands, as well as a series of photos of original building ideas.
Two-story cage for rabbits.
Features and Requirements
In fact, a cage is a box-like structure with opening front doors. Consists of a frame (sometimes with high legs) closed by walls, a roof and a floor. Inside there are compartments for food and rest, separated by a partition with a manhole. In the aft compartment there is a feeder and.
The size and design features of the cages depend on the age, breed, sex of the rabbit, and method of keeping. However, the design will be essentially identical for all groups of animals.

A common blueprint for rabbit cages.
When viewed from above, the cell diagram looks like this. The floor of the cage can either be completely mesh or have a mesh insert for removing feces. The floor in the nesting section must be solid, windproof and warm.

Schematic representation of a cell from above.
Another version of cages is also in demand - in which there are sleeping compartments on the sides, and in the center there is an area for feeding and activity. Such blocks are longer (up to 1.2 m), the standard height is about 35 cm.
There are several types of cellular contents:
- in room;
- on the street;
- combined - part of the year indoors, part - outdoors.
- use of high-quality, durable, rough building materials;
- reliability and stability of the structure;
- no more than 3 tiers of cages (installation of a slanting roof for effective drainage of feces);
- presence of a canopy.
Important! In winter, it is imperative to take care of insulating the cells. The boxes must be reliably protected from frost and wind, especially if you plan to breed animals.

Types of cells
As we have already indicated, the design of a house for animals is selected based on many factors. Therefore, below we will briefly consider the main distinctive features of blocks for animals with different needs:


House for rabbits and baby rabbits.
In addition to standard cages, there are also options with an aviary. If there is free space, you can install just such blocks. The enclosure is set up either under the structure or near the back wall. At least one of the walls of the enclosure should be mesh, but the option is also popular when the back wall is solid and the rest are made of mesh - as in the photo:

Two-story cage with an aviary.
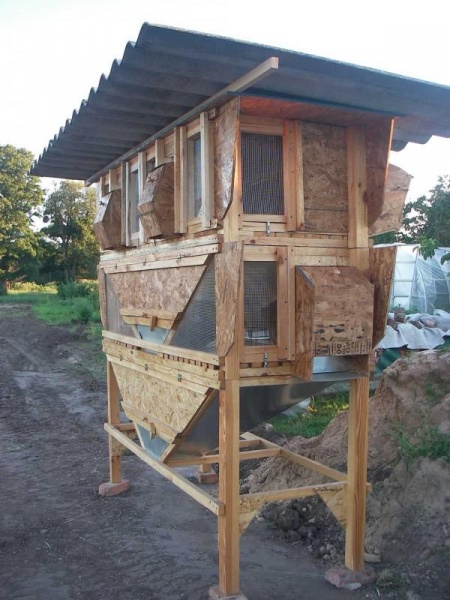
If there are a large number of individuals, the shad will be a convenient design for keeping. It is a frame with 2-3 tiers of cells under a canopy. This whole structure looks like a mini-barn, but it greatly increases the efficiency and ease of care, allows for efficient use of space, and each animal can be provided with a separate block. You can also build a shed yourself.

Shed for rabbits.
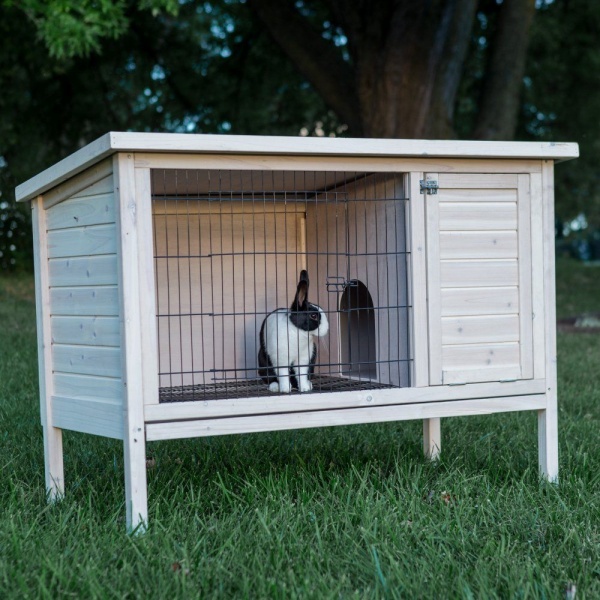
Depending on the needs of the animal and your goals, the appearance of the structure can be absolutely anything. For example, for males, who are usually kept alone, you can build a very simple one-story block:

A simple one-story cage.
You can also make a frame and divide it into three compartments to house several individuals under one roof.

One-story block with three cells.
If you have enough space and the number of animals is small, you can make bunk (two-story) apartments for animals:

A two-story cage in the form of a house for one individual.
Another option for a two-tier block with a symmetrical, attractive facade:
Please note: In all such designs with an enclosure, a tray is located below the upper tier for effective removal of feces.

A two-story cage in the shape of a house.
If you wish, you can use the most original ideas and make a cage for rabbits with your own hands like a mansion, as in the photo below. To descend into the walking area, the block must be equipped with a staircase.

Blue cage-teremok.
And here’s another extraordinary design: in order to make good use of the space, there are beds with herbs on the roof of the block.

Cage with seedlings on the roof.
Another example of the design - on the sides of the block there is a feeder and a drinker. There is a nest in the center with holes on both sides. Thanks to the convenient door, babies can be accessed and perform care procedures without any problems.

House with compartments.
In the photo below we see a very original, practical and simple design similar to a wheelbarrow. The animal house is equipped with a pair of wheels on the back side and a pair of holders on the front. If necessary, the cage can be quickly and without assistance transported to another location. At the same time, the block is equipped with a nest and there is enough space for walking.

Transportable house on wheels.
To make the economic part of the yard look aesthetically pleasing and original, houses for livestock can be built in the oriental Pagoda style.

Pagoda style house.
If you need a spacious enclosure for walking young animals, you can make a metal structure, completely mesh with a small shelter.

Spacious enclosure for rabbits.
Before you start building a home for livestock, read these simple recommendations. They will save you a lot of time during the creation process and allow you to avoid some mistakes:
- For year-round outdoor maintenance, it is better to choose thick boards for making walls. If the rabbits are kept partially outside, the sides of the cage can be made of plywood. If rabbits are outside only in the summer, then the walls can be made from durable mesh.
- When kept outdoors, the structure must be placed at a height of at least 0.7 m from the ground. This will protect the animals from cold, precipitation, as well as rats and other animals.
- The floor can be constructed from wooden slats or mesh. The size of the cells should be about 1-1.5 cm so that manure can pass through the holes freely, but the animals do not injure their paws.
- For the roof you can use boards or plywood. And for reliability, put any available roofing material on top. The only thing worth considering is that the metal sheets can get very hot in the sun and overheat the cage, so you will have to install a canopy on top.
- On the front wall you need to install two doors on hooks, one mesh, the other wooden.
- The wooden elements of the house will most likely be chewed, so it is recommended to cover the most vulnerable parts of the cage with thin sheets of tin, namely: the edges of wooden beams in the frame and doors, the manhole, and the feeding trough.
- In case of bad weather, removable glazing should be provided. The frame with glass can be attached in different ways, for example, on hooks, and removed in sunny weather.
Idea: the facade and external walls can be covered with decorative material or painted to give the house a decorative look.

Cage with supports.
Necessary materials
So, let's consider making a three-tier structure for group keeping of rabbits.
Necessary materials:
- timber with a section of 5*5 cm;
- aluminum plaster corner;
- screws;
- metal connecting corners;
- slats 24*12 mm (for the floor, you can use a metal mesh);
- galvanized sheets.

All fastenings in the cage will look like this.
Required tool:
- construction stapler;
- grinder (hacksaw);
- roulette;
- screwdriver;
- electric drill.
For construction we will use the following drawing. One tier is shown here; 3 of these structures will be required.

Drawing of a cage (one tier).
Manufacturing process
Below are detailed step-by-step instructions for making a house.
- First you need to prepare the material for work - cut the timber into the required sections. So, you will need 16 pieces of 1.9 m each (12 pieces need to be sheathed with corners on one side), 24 pieces of 0.35 m each, 18 pieces of 0.8 m each, 12 pieces of 0.45 m each, 6 pieces of 0. 7 m. All prepared sections must be sheathed on one side with a corner using a stapler. These parts will be in direct contact with animals, which means the wood needs to be protected from being chewed.
- To make the first tier, we assemble the frame. To do this, we connect 2 segments of 1.9 m and 0.35 m with corners. The result is a rectangle.
- Next, on a long section, measure 55 cm from the edges on each side, top and bottom. We make notes. Now we insert a beam 0.35 m long into the middle of the rectangle so that the marking line is closer to the center.
- This results in the following division:
- We make a hole for the feeder. To do this, find the middle along the long line and make a mark. On the opposite side, mark 0.7 m on the block from the right and left ends. We apply 45 cm long bars in a triangle for fitting, mark an angle and cut them with a hacksaw and attach them.
- Using the same principle, we construct the second part for the first tier. Using bars 80 cm long we connect both parts. The frame of the first tier is ready.
- For the floor, you can use wooden slats or metal mesh. If you use slats, you must first drill holes in them for screws, otherwise the thin slats may crack. Watch the distance between the slats - it should be about 1-1.2 cm so that the animals do not injure their limbs.
- The side parts of the structure, as well as the lintels, are made of plywood. Instead, you can use mesh or boards.
- For the roof we use galvanized sheets. They should be slightly larger in size than the frame, so that it is possible to make small canopies over the compartments.
- Using hinges on the front, you need to attach the doors made of mesh and plywood. At this point, one tier is completely finished.
- At the end of the cage, the wood must be treated with fire. Firstly, it will remove burrs and make the wood smoother. Secondly, roasting will eliminate most microorganisms from the upper layers of the wood. Then the structure must be treated with a disinfectant, for example Brovadez, according to the instructions.

Preparing the bars.

We fold the frame.

Insert jumpers.

Caracas in the making.

We make a hole for food.

Finished tier frame.

Fastening the slats to the floor.
In principle, you can stop there if you do not need to accommodate a large number of living creatures. But if there are a lot of rabbits and not enough space, you can continue and fold the three compartments into a single three-story structure.
To do this, you will need strong beams 2 m long (4 pieces). The compartments must be secured using metal corners. The first compartment must be at least 30 cm above the ground. The distance between compartments should be kept at least 10 cm to accommodate pallets.

Ready design.
Thus, we presented a selection of photos with original design ideas, and also examined the step-by-step production of rabbit cages with our own hands.
Video: step-by-step construction of a rabbit cage.
If you decide to have rabbits, this is a profitable activity: they are unpretentious, do not need special food, and reproduce and grow very quickly. But you will definitely need rabbit cages. I will tell you in what conditions these furry rodents should be kept, and what kind of houses should be for them.
Condition 1. Rules for keeping rabbits
There are two options for cell locations:
- indoors, for example, in an extension to a house or a separate barn;
- on open air.

If the cages will be placed outdoors, adhere to these rules:
- Homemade Rabbits do not like direct sunlight. Therefore, their houses should be located in the shade of trees or protected by an artificial fence that will diffuse the rays of the sun.
- Ambient air humidity should be no more than 60-70%. Place the cages in an elevated and dry area, away from bodies of water.
- Drafts often cause rabbit diseases. Animals should not be exposed to air currents exceeding 30 m/sec.
- Cages must be well ventilated. The fumes from the rabbits' secretions should not harm their health.
- It is highly advisable to install rabbit houses facing east.
For the winter season, the cages should be insulated; the temperature inside should vary from +10 to +20 °C. Particularly carefully insulate the nesting compartment for queens and their offspring.

- in winter, the room should be illuminated for no more than 10 hours;
- the walls must be plastered;
- be sufficiently ventilated;
- The best option is if the south side of the room is equipped with a window covering the entire wall.
- cages can be made at a height of 80-100 cm from the floor, so the rabbits will be protected from bites of rats and mice, and it will be easier for you to care for your pets.
Condition 2. Cage design and dimensions
The cages must be of a certain size and design.
Dimensions of the rabbitry

The size of the cells depends:
- from the breed of rabbits;
- schemes for their maintenance (“battery” cages, mini-farm, industrial farming, etc.);
- standard values: young animals need 0.12 m² of area, males - 0.17 m², and females - 0.5 m².
Common cage sizes for rabbits:
- for rabbits - 50×70×30 cm;
- for adults - 50×100×30 cm.
Most often, houses are made into two cells. In such paired rabbitries, the nesting compartments are adjacent to the outer walls of the cages. They communicate with the feeding areas through passages (manholes) measuring 17x17 cm.
Features of a rabbit house

There are doors on the front side of the rabbitry: two mesh doors in the walkways and two solid ones in the nesting areas. Between them there are drinking bowls and nurseries. Feeders are attached to the front of the screen doors.
The entire area of the cage for keeping rabbits is divided into a walking section and a nesting area (dead nook). The size of the walking area can vary, but most often it is 50 cm in width and length.
The little cubby beloved by the animals is a box 25 cm wide and 50 cm long. Rabbits sleep in it, and also hide in bad weather or when they feel danger.
The nook is tightly sheathed and only a removable door is hung on its front side. The hole is made in the wall adjacent to the walking area.

Rabbit cages are made with slatted or mesh floors. This is necessary so that their waste can freely fall into the tray located under the floor.
The height of the front side of the house should be 50-55 cm, and the back wall should be given a height of 30 cm. In other words, the roof of the cage should have a slope. With a tiered arrangement of rabbit hutches, it will simultaneously play the role of a tray for the upper cages. Therefore, the roof must be sheathed with galvanized sheet iron.
What materials should I use?

The best option for cell construction- use environmentally friendly wood and its processed products.
- A wooden beam is well suited for constructing a frame.
- You can cover the walls with plywood or boards. Chipboard is not suitable for this; this board absorbs moisture, swells from it and begins to crumble.

- To arrange the floors, use a welded mesh with a cell size of 1.5x1.5 cm.
- For flooring, you can also use wooden or plastic slats 2-3 cm wide. Stuff them in increments of 1.5 cm between each other. This way, the rabbits' waste will fall freely into the pan.
- The step should not be more than the given figure. Otherwise, the animals’ paws will get stuck in the cracks, and they may break them.
When making a house for a rabbit with your own hands, remember one important condition. The materials for its construction must be smooth, without burrs, splinters and other inclusions that cause injury.
Stages of making a cage

I will describe to you how to make the simplest cage for keeping rabbits indoors. Using this scheme, you can also build a house for open air, but then you will have to use OSB.
The design of the cage must be shown in the drawing. Draw it, focusing on the dimensions of a single rabbitry: length 150 cm, width 70 cm and height 70 cm.
But it’s better if the rabbit cage is a double cage, so you’ll save building materials. Then the framework should look like this:
- length - 300 cm;
- width - 70 cm;
- the height in front is 120 cm, and behind - 100 cm.
Tools and materials
Before making a rabbit cage, prepare the materials:
- two sheets of plywood, 150x150 cm in size and 1 cm thick;
- 10 wooden blocks, 3 m long and 3x5 cm in size;
- 3 m² galvanized iron mesh, with cells 1.5x1.5 cm;
- 1 kg of self-tapping screws, 3 and 7 cm long.
And, of course, you will also need the appropriate tools.
Assembling a rabbit house
| Image | Instructions |
 |
Step 1. Construction of the frame
Assemble the frame on a hard, level surface. Dimensions of the base of the house: length 3 m, width 0.7 m, front height 1.2 m, rear 1 m. The frame must have legs. Screw the mesh onto the floors of the structure with your own hands. You can fasten it without reaching the edges of the structure, the queen cells will be located there. Their floor must be solid. |
 |
Step 2. Work on the queen cells.
First, make the back wall from plywood: cut it to the size of the frame and screw it to the beam with screws.
|
 |
Step 3. Construction of the feeder.
Fix the block vertically in the center of the structure. Screw 2 feeders to it. Their width should be 30 cm and height 7 cm. Screw two guide bars over the feeding area in increments of 20 cm. |
 |
Step 4. Feed frame.
It is made from plywood. This is a device, the upper part of which is inserted between the guide bars, the lower part is placed in the feeder. |
 |
Step 5. Additional feeder.
Place another one near the main feeder - under the hay. Make it from iron wire. |
 |
Step 6: Installing the roof and doors.
Line the free area of the rabbit cage with plywood. Put on the roof. It should have an overlap of 5 cm in front, and 10 cm on the sides and back. Leave a hole in the center of the house. You will put food through it. Lastly, install the 50x30cm screen doors. |
Conclusion
Rabbit cages are easy to make yourself. The main condition is that they must be spacious and built from environmentally friendly materials. The video in this article will clearly demonstrate all the stages of cage installation. If you have any questions, ask them in the comments.