Program 1s 8 zoom version 2.5. Publications
Like previous versions of the 1C: Salary and Personnel Management program, the new edition 3.0 requires initial setup for further correct operation. This article will look at how you can set up personnel records and where the necessary parameters for salary calculation are located.
The accounting settings can be accessed through the “Settings” section, where we immediately notice two highlighted items that require configuration at the very beginning of work.
First, let's look at setting up personnel records. 
The first option is to check the control of the uniqueness of personnel numbers; if there is a need to protect yourself from the appearance of duplicate numbers, then check the box. If there is no checkbox in this position, then recording different employees with the same personnel number will be possible.
The following position concerns part-time work. When using such types of work, be sure to check the box so that in the future it will be possible to draw up part-time work schedules and issue orders. The third item presented in this section of the settings is about the use of part-time jobs - the checked box allows you to register an increase in the job responsibilities of employees.
Setting up personnel records also includes setting up staffing and military records.

To set up the staffing table, you need to follow the hyperlink of the same name.

First, we need to decide whether the program will maintain a staffing table; if so, check the box and move on to the next item, which asks us to enable automatic verification of personnel documents for compliance with the staffing schedule. Thus, we mark the positions we need with checkboxes, carefully reading the description of each of them. Next, we select the method of reflecting the surcharges in printed form and the possibility of using a reservation by entering a specific number of days. We save all the staffing settings by clicking the "Apply and close" button.
After the staffing table, we see the setup of military records, which are also filled out according to the needs of the organization.

And the final point in setting up personnel records is taking into account the specialties of employees. Selecting this setting will allow you to store information about what specialties an employee must have to fill a particular position.
Now let's move on to an equally important setting - setting up payroll calculations. If, in addition to personnel accounting, the program calculates salaries and pays them, then check the box to use the program for these purposes.

Then, clicking on the hyperlink “Setting up the composition of charges and deductions” opens an additional window with several tabs, the first of which is “Hourly pay”. It is recommended to check the “Apply hourly pay” checkbox, since if working in part-time shifts is practiced, then when applying daily pay, the program will consider a part-time day as a full day, and the employee will receive payment for the entire day, and if hourly, partial payment for the time worked is possible. Below we note whether the company performs work in the evening or at night, whether there is overtime or overtime. When time is paid at different tariff rates, the “Several types of time in the work schedule” checkbox is checked. If there are additional breaks in work to feed the baby, the corresponding checkbox is also selected.
The second tab “Vacations” allows you to mark the types of vacations used.

“Accounting for absences” is the next tab, which indicates the reasons for employees’ absence from the workplace. Accordingly, we put checkboxes next to those absences that are possible in your organization.

On the “Other accruals” tab, mark the accruals that may be registered in the program, after which they will appear in the list of accruals.

As for the “Deductions” tab, it is also proposed to check the boxes for those deductions that will be applied at the enterprise.

Click the "Apply and Close" button to save the settings. And we return to further setup of salary calculation. A block on the use of accounting for financing items is presented for non-profit organizations.

We determine whether the calculation and payment of salaries will be carried out by department or not. It depends on the number of employees and the structure of the organization.
Next, we note the need for automatic recalculation of documents, this is a matter of the performance of your computer, you don’t have to check this box, then after editing the document you will need to manually click the “Recalculate” button.
The use of earnings indexation will affect the calculation of vacation pay, business trips, etc.
If the practice is to issue loans to employees, civil contracts, then check the box in the appropriate positions. It is in this section that it is necessary to note whether tariff groups and tariff rates will be used.

If an organization makes payments not related to wages, you must indicate this in this section of the settings.

Several options are offered to choose from when converting an employee's tariff rate into the cost of an hour (day). Typically, this information is used when it is necessary to calculate payment for work on weekends and holidays, for work at night for employees who receive a monthly salary. Please note that this setting determines the procedure for salary recalculation for the entire enterprise. An individual procedure can be selected in personnel documents.

The last thing you need to choose here is on what basis to calculate the time standard when it changes due to a change in work schedule not from the first day of the month. The first option will analyze both schedules before and after, identify overtime and count it. The second option, if overtime is detected during the transition month, will consider that all the time worked is according to schedule.
To register the fact of hiring under an employment contract and fill out an employment order in the program, you must:
- Register a new employee in the directory Employees(menu Enterprise - Employees).
- Enter document (menu).
Recruitment assistant. It allows you to enter all the necessary data about a new employee in a step-by-step mode and, upon completion of entry, automatically create a new element in the directory Employees and enter the document Recruitment to an organization. You can also apply for a job without using Recruitment Assistant. In this case, hiring is registered in two stages: registration of a new employee and execution of an employment contract, execution of a work order.
Registration of employment
Hiring an employee using the hiring assistant
Registration of employment
To apply for a job, you can use Recruitment assistant. To use the assistant, the checkbox (menu) must be selected in the user settings
Registration of employment
When creating a new employee in the directory Employees(menu Enterprise - Employees) by button Add the form opens automatically Recruitment Assistant. Entering information about a new employee is carried out “step by step”.

1. On the first step Basic data(Fig. 3) enter the following information about the employee:
- Surname, Name, Surname employee. If in the directory Individuals(menu Enterprise - Individuals) an individual with such a full name is already registered, then a new employee is automatically offered to use the data of this individual (in the dialogue). If the employee’s data has not been previously registered, and the list shows namesakes, select the command Create a new individual ;
- Date of Birth And Floor employee. If the data of a previously registered employee in the directory is used for a new employee Individuals an individual (in dialogue List of individuals with similar data) (Fig. 4) and an individual was selected using the button Select marked in the list), then the fields Date of Birth And Floor are filled in automatically and cannot be changed in the assistant form;
- check the box Staff member or An employee under a civil law contract;
- field Organization filled in by default. If more than one organization is registered in the information base, then you must select the organization to which the employee is being accepted;
- in field Table number— employee’s personnel number; by default, the next free personnel number is offered, which can be changed if necessary.

2. On the second step Place of work(Fig. 5) enter information about the conditions and place of work of the new employee:
- the default is the checkbox Create a job order. In this mode, when the assistant’s work is completed, a hiring document is created in the information system. If the document does not need to be created, then the checkbox can be unchecked;
- check the box Type of employment: main place of work, part-time (external) or internal part-time;
- indicate the department, position, work schedule of the new employee, the number of positions he occupies, the number of months of the probationary period (if a probationary period is established upon hiring), the date of hiring;
- The number and date of the employment contract are filled in automatically. If necessary, you can change the number and date of the contract, and in the case of employment under a fixed-term employment contract, fill in the expiration date of the contract.

3. On the third step Salary enter information about the accruals assigned to the employee upon hiring: indicate the main type of accrual for the employee and its size, as well as a list of allowances provided for the employee and the values of the indicators for their calculation.

4. On the fourth step Additional Information enter additional information about the employee: tax identification number, Pension Fund insurance certificate number, as well as information about citizenship, disability, the right to standard tax deductions for personal income tax, information about income from the previous place of work and taxpayer (employee) status.

5. At the last step Shutdown you can specify a name clarification for the created directory element Employees(for the purpose of visually distinguishing directory elements corresponding to employees with the same full name).

To finish the job Recruitment Assistant and recording the data entered using it, click the button Ready.
In this case, the following will be automatically created in the information base:
- Individuals Individuals). Viewing and editing personal data of individuals (entering the address of residence, passport data, etc.) is carried out in the form of a directory element Individuals Employees
- Employees;
- document Recruitment to an organization .
Employees
From the document form Recruitment to an organization You can generate and print an order for employment in the form T-1 or T-1a.
Hiring without using the Hiring Assistant
You can apply for a job without using Recruitment Assistant. To do this, the checkbox must be unchecked in the user settings Use the Hiring Assistant(menu Service - Users and access rights - Users).

In the directory Employees(menu Enterprise - Employees) create a new element by clicking the button Add. When registering an employee, you can either simultaneously create a new individual (by selecting the switch), or select the individual corresponding to the employee from the directory Individuals(by setting the switch Create a new employee by selecting him from the directory of individuals). The second option is used if an employee is registered who has previously worked at the enterprise under another contract or whose personal data has already been previously entered into the directory Individuals.
In our example, simultaneously with the registration of a new employee, a new individual is created (corresponds to the position of the switch Create a new employee and enter his personal data into the directory of individuals in the form of a new directory element Employees).
In field Name Enter the last name, first name, patronymic of the new employee. On the bookmark General Enter the employee’s personal data (date of birth, Pension Fund insurance number, gender, Taxpayer Identification Number) and the employee’s data, namely the type of contract, the organization to which the employee is hired, type of employment. Field Personnel number is filled by default with the next free personnel number, which can be changed if necessary.

On the bookmark Employment contract Enter the details of the employment contract concluded with the employee. The contract number and the date of its registration in the information system are filled in automatically. The value of these fields can be changed. In field Valid from indicate the start date of the contract. If the contract is fixed-term, then the end date of the contract is entered in the field By. Next, you need to fill in information about the probationary period - the number of months (if the probationary period is not provided for in the employment contract, the field is not filled in), the division of the organization where the employee is hired, his position, work schedule, number of positions occupied and payment upon hiring (type of calculation, payment amount and personal allowances, if any).

On the bookmark Additionally It is possible to divide the organization's employees into certain properties and categories. Properties and categories are additional characteristics that can be assigned to employees for additional analysis in reports.
When saving a document in the infobase, the following will be automatically created:
- personal data of the employee in the directory Individuals(except for the case when the data of a previously registered individual in the directory is used for a new employee Individuals). Viewing and editing personal data of individuals is carried out in the form of a directory element Individuals. You can open an individual’s form from the directory Employees or from a list of individuals;
- employee entry in the directory Employees.
From the directory item form Employees You can create and print: a standard employment contract between an organization and an employee and an approximate form of an employment contract for remote work.
Drawing up an employment order
Registration of employment
Registration of the fact of hiring and execution of an order for employment is carried out using a document Recruitment to an organization. The document can be entered for one or several employees at once.
- Menu Personnel records - Personnel records - Recruitment to an organization.
- Click on the button Add .
- In field from indicate the date of the employment order.
- In field Organization indicate the organization (or its separate division) for which you are registering for employment (by choosing from the directory Organizations).
- Field Responsible filled by default - with the value from the current user’s settings.
- On the bookmark Employees indicate an employee or a list of employees hired from the directory Employees. In this case, the details of the tabular section are automatically filled in based on the employment contract data entered into the directory Employees:
- in the props Subdivision indicates the structural unit to which the employee is being hired (from the directory Organizational divisions);
- in the props Job title the position held is indicated from the directory Organization positions;
- in the props Bid the number of bets taken is indicated;
- in the props date of receipt the date of hire is indicated. If an employee is hired for a certain period of time, then in the details By The end date of the period of work under the employment contract is indicated. Default props By does not appear in the document form. In order to configure its visibility, you need to call the dialog from the context menu List setup and mark the column with a checkbox;
- in the props Probation the number of months of the probationary period is indicated (if the probationary period is not provided for in the employment contract, the details are not filled in);
- in the props Admission conditions you can enter an arbitrary line characterizing the reception conditions for reflection in printed form T-1;
- in the props Schedule indicates the working time schedule for the employee.
- On the bookmark Accruals indicate what planned accruals must be made monthly in favor of the employee, and their amount in accordance with the terms of the concluded employment contract. The list of charges is filled in automatically based on the following data:
- type of employee’s basic accrual and list of personal allowances specified in the employment contract data in the directory Employees;
- list of allowances provided for a staff unit by the staffing table of organizations (menu Personnel records - Staffing table);
- organization motivation schemes: job motivation schemes and motivation schemes for the workplace (menu Personnel - Motivation).
If necessary, the list of planned accruals can be supplemented. It should be borne in mind that the employee may be assigned only one main planned accrual, i.e. accrual according to which working time is recorded (type of time recording — Accrual for work within the normal time limits(bookmark Time types of calculation)). Such accruals pay for time worked within the normal time limit according to the work schedule and measured in whole days (shifts) (for example: salary by the day, salary by the hour, etc.).
The 1C: Accounting 8 application supports a mode in which a local program, for example, 1C: Salaries and HR Management, is used to calculate payroll and personnel records. At the same time, data exchange is carried out through a file, similar to how the exchange is organized with the client-bank system.
Enabling payroll accounting mode in an external program
To start using this operating mode, follow these steps:
After installing the described settings, in the section Employees and salaries, commands for calling processing for unloading and loading data, as well as documents into which data will be loaded, will become available.
Uploading data into the local program "1C: Salary and HR Management"
To upload data to the payroll accounting program, follow these steps:

As a result, the exchange file will be saved to the local computer, and it can be loaded into the 1C: Salary and Personnel Management program.
In the future, when the two programs work together, it may be necessary to update data on analytical accounting objects contained in the salary accounting information base. In this case, when exchanging, it is recommended to check the boxes for sections of the item Accounting objects.
Sections Chart of accounts And Types of subconto It is recommended to include it in the transfer during the initial exchange and if changes were made to the chart of accounts of the 1C: Accounting 8 application.
Loading salary data into the 1C: Accounting 8 application
To download salary data, follow these steps:
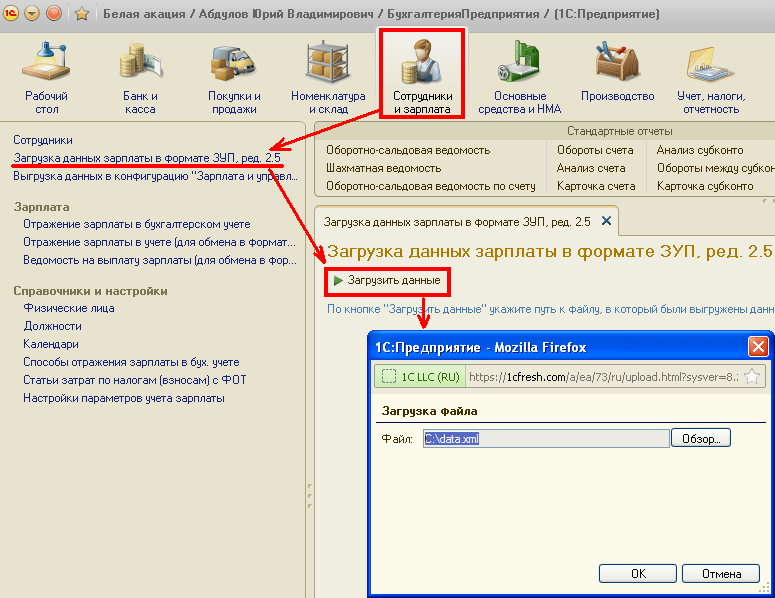
After the file is uploaded to the service, salary data will appear in the 1C: Accounting 8 application (see the next section).
additional information
Salary data is loaded into the following documents of the 1C: Accounting 8 application:
- Reflection of salaries in accounting (for exchange in ZUP format, rev. 2.5)- information about accrued wages and withheld taxes (contributions) from the payroll is loaded into the document. When posting a document, entries are generated to record wages in accounting, and wages and taxes (contributions) from the payroll are reflected in tax accounting;
- Salary payment slip (for exchange in ZUP format, rev. 2.5)- information about salary payments is loaded into the document. To reflect the fact of salary payment in accounting and tax accounting, you should enter a document in the program Account cash warrant with the type of operation Payment of wages according to statements or Payment of wages to an employee, indicate the document Statement... and the payment amount.If the payment is made by transfer to a bank, then you must enter the document Debiting from current account with the type of operation Transfer of salaries, indicating Statement... and the payment amount.

Important! If in the accounting parameters settings on the tab Employees and salaries option selected Summary for all employees, then in the documents for salary payment ( Account cash warrant And Debiting from current account) indicate Statement... not required. In this case, when downloading data from the local program "1C: Salary and Personnel Management", you should also indicate that the download is carried out collectively by employee.

When selecting a statement in documents Account cash warrant And Debiting from current account the amount to be paid is determined automatically and cannot exceed the amount indicated in the statement (or for a group of statements, if several are specified). The amount to be paid is determined by the value of the details Payout document Statement...- i.e. Only those amounts for which the value is indicated are considered paid Paid.

In the document Account cash warrant should choose Statement... Through the cash register.
In the document Debiting from current account should choose Statement..., in which the payment method is indicated in the header Via bank.
Uploading data from the local program "1C: Salary and HR Management"
To carry out an exchange with the "1C: Accounting 8" application, in the program settings, you must first indicate with which accounting application you intend to exchange. For this, in the form Setting up the program(menu Service / Program settings), on the tab Accounting program you should indicate the accounting application used (in our case, this is Accounting 8 ed. 3.0), and also select the mode of uploading transactions - with detail by employee or summary.
If you select the upload mode in the settings Summary, then in the list of objects the item Salary payable will be missing. In this case, in the 1C: Accounting 8 application, data on payment statements is not required to reflect the fact of salary payment in accounting.
Processing is intended for downloading data Uploading data into an accounting program(menu command Service / Data exchange / Uploading data to an accounting program). In the processing, you should indicate the organization for which the upload is carried out, the period of the uploaded data and the file for uploading the data.

We wish you success and pleasant work!
The 1C: Salary and Personnel Management 8 program, edition 3, has technological advantages compared to previous editions. It allows you to automate operations on personnel records, payroll calculations and preparation of “salary” reporting in accordance with current legislation. How to prepare to migrate data from older versions? What options for transferring information exist, and which one should you choose? What should you pay attention to when starting to work with edition 3, and what settings need to be made? 1C experts say.
Why you need to upgrade to edition 3
More than 10 years have passed since the release of the 1C: Salaries and Personnel Management 8 program, edition 2.5. During this time, changes occurred in the legislation that could not be predicted when designing this version: for example, the dependence of the deadline for transferring personal income tax on the date of actual payment of income. Complications of reporting requirements led to the fact that the architecture of the program version 2.5 was no longer effective enough.
To replace it, the 1C: Salary and Personnel Management 8 program, edition 3, was developed. In November 2016, it was decided to end support for old editions of payroll programs in 2018. Users were notified of this in the information release (letter) of the 1C company No. 22222 dated November 18, 2016.
Preparing for data migration
The transition to a new version of the program should begin by updating the working database (hereinafter referred to as the DB) to the latest current version. The version number of the working program is displayed in the help About the program(menu Help - About the program). You can check the current version number on the 1C:ITS portal via the link https://releases.1c.ru/total. A user with full rights can transfer data. To transfer data, you need to know the location of the database on the disk (full path to the database), the user name with full rights and its password. You can view the database storage directory in the menu Help - About the program.
Before the transfer, it is recommended to “close” the month in version 2.5, that is, make all accruals and payments. It is useful to put as much order in the working database as possible in order to minimize transfer errors: delete objects marked for deletion and deal with cross-references to objects that are not deleted. In configurator mode, it is recommended to run Testing and fixing on the menu Administration. Before performing the transfer, do not forget to stock up on a backup copy of the working database edition 2.5 ( Administration - Upload infobase).
Then you need to install the program “1C: Salaries and HR Management 8” edition 3 with the current version (you can find out the current version number).
note that during installation the program will report the required version of the 1C:Enterprise 8.3 platform. Make sure that the 1C:Enterprise 8.3 platform is installed on your computer, version not lower than the recommended one.
When starting the program you should Add add a new information base to the list of working databases by selecting Creating a new information base. Next, when selecting a template from the menu Creating an infobase from a template, the installed program “1C: Salaries and Personnel Management 8” edition 3 should be specified as a template. It is to this new database that the data from the working database will be transferred. Moreover, the data in the working database will remain unchanged, and you can use the information from version 2.5 at any time.
You can continue to keep records in edition 2.5 in parallel with work in edition 3 to compare and evaluate the results obtained. Working in parallel, you can complete accounting and calculations for 2017 and prepare reports in the DB version 2.5, and payroll calculations starting from January 2018 are carried out in the new program.
Setting up data transfer
When you first turn on the new version of the program (“1C: Salaries and Personnel Management 8” edition 3), the assistant starts automatically Initial program setup. On the bookmark Start... the switch for selecting a data source for transfer from previous reactions must be set to: Transfer data from the program “1C: Salaries and Personnel Management 8” edition 2.5.
For users running version 7.7, automatic data transfer is also provided. The program sequentially transfers data to edition 2.5, and then to edition 3. To do this, the switch for selecting the data source for transfer from previous reactions should be set to position Transfer data from the program “1C: Salaries and Personnel 7.7” edition 2.3.
Then click on the button Further the transition is made to the selection of a working information base from which data needs to be transferred. The user is offered a list of all infobases installed on the computer (i.e., those that are available in the list of databases when starting 1C:Enterprise). You must select the 2.5 edition database from which you want to transfer data. The path to the infobase is displayed below the list when you move the cursor over the list of infobases. You must enter user authorization information. To do this, indicate the name User and him Password in the appropriate fields.
note: it is necessary to specify a user who has full rights assigned in the database from which the information is transferred. Next button press Further opens a bookmark . Here you should indicate Month of start of operation(Fig. 1). You can start working with the program from any month.

Rice. 1. Setting up loading from the infobase
By default, the so-called “simplified” data transfer is carried out. It allows .
Learn more about the two transfer options
“1C: Salary and Personnel Management 8” provides 2 options for data transfer:
1. Use HR accounting and payroll capabilities;
2. .
Default Data Transfer Options
The default data transfer option is called simplified, since the minimum amount of data transferred is sufficient for a comfortable start to accounting in the new edition.
The following data can be transferred:
- directories: organizations, divisions, positions, employees and basic reference information related to them;
- accruals and deductions with a regulated method of calculation (salary, bonus, writs of execution, etc.);
- staffing for the month of commencement of operation;
- personnel history of employees to fill out their personal cards (T-2);
- data for calculating average earnings: for Social Insurance Fund benefits - for the previous 3 years, for vacations and other cases - for the previous 15 months;
- accounting data for personal income tax and insurance premiums in the year of transfer (if operation does not begin from the beginning of the year);
- balances of mutual settlements for the month of start of operation.
The list of staffing positions is not transferred, but if necessary, it can be formed according to the staffing arrangement.
The program contains documents provided for starting work from scratch, for example, . These are the ones that are filled in automatically during simplified data transfer. Personnel information defining the accruals due to the employee is placed in the document Initial staffing. Based on the status of mutual settlements with employees at the beginning of the transfer month, a document is generated Initial salary arrears.
Data for the initial entry of which no special documents are provided are transferred to auxiliary documents Data transfer. So, despite the fact that personnel documents are not transferred, information from them is stored in documents Data transfer With number“RKD” (where RKD is the personnel data register). Official documents Data transfer enter information into the appropriate accounting registers (Fig. 2).

Rice. 2. Documents “Data transfers”
Go to documents Data transfers can be in the menu Administration - Data Transfers. The document number is alphabetic and corresponds to the registers where the data is stored:
- ROtp - information register Leave register;
- IL - accumulation register Deductions under executive documents;
- ZP_SZO - accumulation registers Time data for calculating the average (general) And Data on accruals for calculating average earnings (total);
- ZP_SZFSS - accumulation registers Data on accruals for calculating average earnings (FSS), Policyholder data for calculating average earnings (FSS) and information register Time data for calculating the average (FSS);
- OCO - accumulation registers Actual holidays;
- ZP - calculation registers Accruals And Holds;
- WIP - accumulation registers Retention accruals for employees, Hours worked by employee;
- Personal income tax - accumulation registers: Income accounting for personal income tax calculation, Property deductions (NDFL), Provided standard and social deductions (NDFL), Calculations of taxpayers with the budget for personal income tax;
- SV - accumulation registers: Income accounting for calculating insurance premiums, Calculated insurance premiums, Insurance premiums for individuals, Settlements with funds for insurance premiums;
- VZ - accumulation registers: Mutual settlements with employees, Salary payable;
- DZP - accumulation registers: Mutual settlements with depositors.
The program makes no attempt to transfer information that may be distorted due to errors in the source database. Information that obviously cannot be transferred qualitatively due to differences in accounting methods or data structure is not transferred at all.
For example, the following data is not transferred:
- accruals and deductions with arbitrary formulas;
- personnel documents, personnel history of employees for the generation of analytical reporting;
- actual accruals and payments for the generation of analytical reporting;
- information about employee loans;
- valid at the time of transfer of leave, including for child care.
Due to the fact that as a result of the transfer there is no data that is not adapted for edition 3, it is possible to Use HR accounting and payroll capabilities.
Description of the complete data transfer
You can choose the option of complete data transfer when Initial program setup on the bookmark Setting up data loading from the infobase link Settings, switching the setting to Use accruals from the previous program (not recommended). When choosing a non-recommended option, you specify not the month, but the period for which the data will be transferred. The period until which data is transferred is not limited. For example, if data for future months has already been entered into the version 2.5 database, then they will also be transferred. With this transfer option, a complete data transfer is attempted, but there is a risk of transferring outdated data and accumulated accounting errors or not transferring at all. The main reason that this option is not recommended for use is that the method will only work if there are no errors in the source database.
Of course, the full transfer option has not only disadvantages, but also some advantages. This option ensures the transfer of almost all information accumulated in the database of the previous edition. And the new database will have access to personnel documents and information about employee loans. When transferring data completely, actual accruals and payments are transferred to the program, allowing you to generate analytical reporting for past periods in the new program.
The option of complete data transfer is suitable for organizations with a simple salary system, a small number of employees, a short period of work in the program, and, therefore, a small amount of information. If the operation is successfully completed, all directories, plans for types of calculation, personnel documents, documents assigning planned accruals and deductions (for example, assignments of additional payments, writs of execution), information about the insurance and tax status of the employee and rights to deductions will be transferred to the new database of edition 3 according to personal income tax.
Documentation Data transfer are filled in automatically with information about time worked, accruals, deductions and payments made before the transfer. Accounting data for personal income tax and insurance premiums are also recorded in documents Data transfer.
Data transfer process
When transferring data, several stages automatically go through in succession:
- connection to the information base;
The duration of their execution depends on the amount of information and can take a long time. At the stages of uploading and downloading data, an additional indication of the process progress is made: it is reported which accounting section information is currently being processed.
Possible mistakes...
The data transfer process is logged, and if the transfer is stopped due to an error, the reason for its occurrence can be seen in the report, which opens at the link Error Information.
...at the stage of connecting to the infobase
Errors at the stage of connecting to the infobase may be as follows:
- database registration error;
- the path to the database, username or password is incorrectly specified;
- the user performing the transfer does not have sufficient rights;
- other users are working in the source database (when it is opened to transfer data).
Registration errors are corrected automatically. To do this, use the button To correct(Fig. 3).

Rice. 3. Error information
In other cases, the user must independently indicate the correct data, make sure that they have full rights and exclusive access, and then try to transfer again.
...at the data upload stage
Errors at the data upload stage should be examined in the protocol Error Information and correct it in the original database.
...errors at the data loading stage
At the data loading stage, errors are usually of a technical nature and prevent further data transfer. Such errors must be reported to the technical support department.
Settings after data transfer
After successful completion of the data transfer, you need to perform the initial setup of “1C: Salaries and HR Management 8” edition 3, taking into account its new capabilities compared to the previous edition, and answer all questions Initial program setup assistant, as when starting accounting in the program, and enable program capabilities that correspond to the specifics of payroll calculation of the organization.
If you decide to maintain a staffing table, then offers to check it and fill out planned accruals for positions. During the transfer, positions are created unapproved - after checking and additional filling, they should be approved in the program.
As a result of the transfer, documents are generated Data at the beginning of operation, filled out according to the current arrangement of employees. They need to check the planned accruals of employees, work schedules and other data.
If this information has already been filled out in the staffing table at the previous step, then the document can be filled out first by command Update according to staffing schedule on the menu More. This will update all rows in the document. When updating according to the staffing schedule, data entered into the document manually will be lost.
The transferred data must be checked and further configured. For example, the organizational structure of an enterprise (list of organizations) and the structure of each organization (list of divisions) are transferred to edition 3 without any changes. But the cards of the organization and division, the principle of storing some information, have undergone some changes.
Additional steps...
After transferring data to the 1C: Salary and Personnel Management 8 program, edition 3.0, according to both the first and second options, additional steps must be performed.
...after simplified migration (default option)
Since the simplified version transfers only the minimum necessary information, you need to fill in the data to get started: production calendar, work schedules, tariff groups, set up payment types, etc. Initial program setup assistant suggests entering data such as writs of execution and other planned deductions, information about employee loans, etc.
Transferred data for calculating average earnings is available in Average earnings calculator directly in the documents requiring its calculation.
The transferred personal income tax and insurance premium accounting data for the current year (if operation does not begin in January) can be checked using the appropriate cards, personally for each employee.
With simplified data transfer in the new edition 3, it is possible to generate tax reporting and reports on insurance premiums of past periods, but there is not enough information to generate various analytical reports for past periods. For these purposes, the original database of the previous edition should be preserved and maintained in working order.
...after complete data transfer
Upon completion of the complete data transfer, based on the information contained in the registers, the user can generate analytical reporting for previous periods. It is necessary to make sure that the data from the reports executed in the original and new databases match.
After this, the work base from which the information was transferred is no longer needed and can be saved for history.
Let's sum it up
note, regardless of the transfer method, you should definitely make a trial payroll calculation. The algorithms for setting up formulas and time tracking in edition 3 differ from previous editions, so adjustments to the settings may be required. After weighing the advantages and disadvantages of each transfer option, the user makes his own choice.
You can test both transfer options and make a test calculation to compare the labor costs of setting up the program to start using it.
Hello, dear visitors. Quite a long time ago I published a series of articles on the pages of this site. This series of articles was devoted to ZUP version 2.5. A lot of time has passed and now many accountants work quite successfully for 1C ZUP 8.3 edition 3.1. That is why I conceived a similar series of articles, which will be devoted specifically to ZUP 3.1.
In today's first publication, we will look at the basic program settings that you need to install or at least know where you can install them in order start working in ZUP 3.0. I will not talk about transferring data from ZUP 2.5 (I talked about the transfer in detail in) or from ZIK 7.7, but I will try to explain where to start keeping records in the ZUP 3.0 configuration and what you should pay attention to. Let's look at the settings "Payroll calculation", "Personnel records" and of course "Accounting Policy" organizations. Let's also touch on the new features that appeared in ZUP 3.1 (by the way, the site has a series of articles about, there is a lot of useful information there).
✅
✅
Getting started in the configuration Salary and HR management ed. 3.0 (ZUP 3.0.), the first settings can be made in several ways. One of the simplest is the initial setup of the program using the setup wizard.
In order not to clutter the article with various diagrams and drawings, I will not publish screenshots from the setup wizard. Everything is pretty clear there: you need to fill in as much information as this initial setup will offer.
Another situation is possible when you do not want to fill in the initial data using the wizard, but want to make fine adjustments while working with the program. This can be done, by the way, this is often done, since sometimes it is not immediately clear whether or not it is necessary to set this or that setting. In this article I will show you where you can fill out all this information without using “Initial setup program” in 1C ZUP 3.0.
So, all the settings that will interest us are in the main menu section "Settings". This section contains links that will interest us: Payroll calculation, HR records And Organization details(namely section "Accounting policies and other settings" in the organization details)

But the first thing we must do is enter information about the organization. The fact is that the empty ZUP 3.0 database does not contain any organization. The empty database of ZUP 2.5 by default had an organization called “Our organization” (I talked in detail about accounting in ZUP 2.5 in a series of articles). There is no such thing in ZUP 3.0. Therefore, if you do not at least enter the name of the new organization and try to create a new employee, then he will not be able to save - since the organization cannot be specified.
So, to enter information about the organization in 1C ZUP 3.0, you need to go to Settings - Organization details. A window for entering information about the new organization will open. In principle, you can only set the name and save the Organization, but it is better to enter the maximum number of details that are presented in the form of this Directory.
For example, it is very important to immediately ask Information about registration with the tax authority(the “Main” tab), since it is in the context of this registration that the fact will be recorded calculations, deductions and transfers of personal income tax. And then all this information will be included in regulated reports 2-NDFL And 6-NDFL specifically in terms of registration with the Federal Tax Service. By the way, you can study the mechanism for accounting for calculated and withheld personal income tax, as well as the principle of filling out 6-personal income tax in the article.
It is also important to specify information on the tabs "Codes" And "Funds". This data is also used in regulated reports - 4-FSS, RSV-1 and others (I spoke in detail about the preparation of RSV-1 in ZUP 3.0).

Accounting policies and other organization settings
✅
✅ CHECKLIST for checking payroll calculations in 1C ZUP 3.1
VIDEO - monthly self-check of accounting:
✅ Payroll calculation in 1C ZUP 3.1
Step-by-step instructions for beginners:
Separately, I would like to draw your attention to the tab "Accounting policies and other settings." These settings are unique to your organization. The most interesting and significant parameters are in "Accounting Policy":
- Type of insurance premium tariff– determines the tariff for calculating insurance premiums;
- There are pharmacists; There are flight crew members; There are crew members of sea vessels; There are miners– these checkboxes determine whether the organization has the mentioned employees and, if so, the checkboxes should be checked. After this, it becomes possible to check the appropriate boxes in the “Position” for such employees or in the “Unit” if we are talking about maritime vessels. As a result, the program will charge additional tariffs when calculating contributions (I discussed in detail the effect of these checkboxes in, it was written for ZUP 2.5, but the principle remains the same).
- There are employees with the right to early retirement; The results of a special assessment of working conditions are applied– if you check the boxes, then in the Position and in the Staffing Unit (if the Staffing Schedule is maintained) it will be possible to indicate information about working conditions (harmful or difficult) and the results of a special assessment (if there was one). Based on this data, the program will calculate additional insurance premiums, as well as highlight the length of service of such employees in the individual information of RSV-1.
- The principle of operation of these settings is discussed in more detail in the article
- Contribution rate to the Social Insurance Fund NS and PZ– this is where this rate is set))
- Payment of benefits– if a FSS pilot project is taking place in your region and the payment of benefits is transferred to the FSS, then this is exactly the setting you need. Here you need to indicate from what date the payment of benefits was transferred to the Social Insurance Fund (this is the date from which the pilot project began to operate in your region)
- Standard personal income tax deductions apply– if you want the right to deduction to accumulate over the course of a year (for example, an employee had no income in the current month and the right to deduction transfers to the next month), then you need to select “cumulatively during the tax period”. Otherwise we choose “within the limits of the taxpayer’s monthly income.”
- Use separate territories – becomes available "Territories" directory, in which you can describe certain territorial conditions, the regional coefficient and the method of accounting for wages in this territory. And after that, transfer the employee to this territory, although the transfer to a new unit will not have to be done (for example, if the employee begins to perform work in a special area, but the actual transfer to another unit is not required). You can make a transfer to the Territory using documents "Personnel transfer", "Movement between territories", and document "Table".
- Use special working conditions - becomes available reference book "Working Conditions", in which you can configure working conditions by analogy with how it is configured in the Position/Staffing Unit directory (for pest workers). Then you can transfer employees to the created Working Conditions.
- For example, this may be required when an employee works for a short period of time in a workplace for which certain working conditions are provided (different from his usual place of work). Making a personnel transfer to a new position in this situation is not very convenient (especially if such short-term work is frequent), then you can simply transfer it to pre-created "Working conditions"(this is done using the document “Table”). A similar example is discussed in .

On the “Accounting Policy and Other Settings” tab, you can set Responsible persons Full name of the Manager, chief accountant, cashier to display them in printed forms of the document and in regulated reports (for example, a signatory in 6-NDFL).

Let's move on to the last group of settings "Accounting and payroll":
- Salary accounting; Account, subconto– the accounting method that will be used for types of accruals for the entire organization is determined (unless this method is redefined in the Division, in the form of an accrual or directly in the Employee’s card).
- Salary payment date– ATTENTION: it is better not to set the “On the last day of the current month” setting, unless, of course, the salary is paid on the last day. This setting helps fill in the payment date for interpayment accrual documents if they are paid with salaries. Also, the date specified here affects the calculation of the document “Compensation for delayed wages.”
- Advance payment date - helps fill out the payment date for interpayment accrual documents if they are paid in advance
- As a rule, payment is made - Here you need to indicate the payment method that the majority of the organization’s employees have. You can redefine the payment method in the “Division” information and the “Employee” card.

Payroll settings in 1C ZUP 3.0
✅ Seminar “Lifehacks for 1C ZUP 3.1”
Analysis of 15 life hacks for accounting in 1C ZUP 3.1:
✅ CHECKLIST for checking payroll calculations in 1C ZUP 3.1
VIDEO - monthly self-check of accounting:
✅ Payroll calculation in 1C ZUP 3.1
Step-by-step instructions for beginners:
It is worth noting that the settings that are in the “Organizations” directory apply only to a specific organization. But in ZUP 3.0 there are a number of important parameters that affect the operation of the entire information base. They can be found in section of the main menu "Settings".
First, let's look at the settings group "Payroll calculation"(main menu section “Settings” - “Payroll calculation”). It’s worth immediately noting that this group of settings also has nested settings that can be opened using the link “Setting up the composition of charges and deductions”(there are a lot of important and essential settings for operation)

Let's start with these parameters. Consider the form “Setting up the composition of accruals and deductions.” Here, on the tabs, there are checkboxes that determine the content of the list of accruals and deductions, as well as the list of available documents. For example, if on the tab "Accounting for absences" check the box "Business trips", then access to the “Business Trip” document will open in the information base, and the “Business Trip” accrual type will be automatically created. This configuration principle is what distinguishes 1C ZUP 3.0 - I talked about this in detail in the article. That is, if you do not find some document in the program that should be there, then the reason is probably that the necessary checkbox is not checked in the settings.
There are quite a few checkboxes here, so I’ll highlight the most important ones:
- “Hourly wage” tab:
- If your organization records time by the hour, the accrual type “Payment by salary (by the hour)” is required – check the box « Application of hourly wages» .
- We also check the boxes « Night hours », « Evening hours » and/or « Overtime» , if it is necessary to keep records of work within these types of time, the program will automatically create the appropriate types of time and types of accrual (more about calculating additional pay for night and evening hours)
- I will separately check the box “ Overtime with summarized recording of working hours»—opens access to the documents “Registration of overtime” and to the settings for summarized accounting in work schedules. The mechanism is discussed in detail in the article.
- Vacations tab- check mark "Vacation without pay": access to the document is opened “Vacation without pay”;
- Absence Accounting tab – check mark "Business trip" - told above ; “Absenteeism and no-shows” - access to document "Absenteeism, no-show"()
- Other accruals tab – checkbox “Work on holidays or weekends” - access to the document of the same name and types of accrual (); check mark "Piece earnings"— details about piecework earnings are described in the article
- Holds tab- this is where you need to check the box “Deductions under executive documents” so that in ZUP 3.0 it becomes possible to automate the calculation of deductions according to writs of execution (document "Writs of execution").

Now let's pay attention to the list of settings directly in the section "Payroll calculation"(that is, not in the additional form “Setting up the composition of accruals and deductions,” but on the main form). There are also quite a lot of checkboxes and parameters, so I’ll highlight the main ones:
- Calculation and payment of salaries is carried out for the organization as a whole– if you have several divisions and accrual/payment documents need to be entered by division, then this checkbox must be CLEARED;
- Employee earnings are indexed– check the box and documents that allow you to index your earnings will become available in the program – “Indexation of staffing”, “Indexation of earnings”;
- Loans are issued to employees– a mechanism for accounting for loans and calculating material benefits will become available – documents “Issuing a loan to an employee”, “Loan agreement to an employee”, “Changing the terms of the agreement ...”, “Repaying a loan ...” (section Salary -> see also -> Loans to employees);
- Payments under civil contracts are registered– access to the documents “Agreement (work, services)”, “Author’s order agreement”, “Certificate of acceptance of completed work” will open. All this will be required to maintain records under the agreements. This document can be completed from the “Employees” directory.
- Several tariff rates are used for one employee— allows you to set a constant indicator for an employee without reference to a specific planned accrual. A very useful feature, I highly recommend studying it;
- Uses short-term changes in wages depending on the work performed— allows you to connect the use of the “Places of Work” directory, in which you can describe planned accruals specific to this place of work and assign this place of work to the employee(s) for a certain period using the document “Change of places of work” —;
- Several types of time are used– a new quite useful mechanism will be connected, in which the work schedule will be able to reflect several types of time at once. I talked about this in the article
- Other income of individuals not related to wages is registered– the document will become available “Registration of other income”. It is this document that is supposed to introduce payments such as rent of transport, rent of housing and the like in ZUP 3.0;
- ATTENTION:Information for calculating total average earnings is taken into account for calculating benefits– It is best to uncheck this box. If you don't do this, the following may happen. When calculating, for example, vacation pay, if you open the calculator for calculating average earnings and click OK when closing the calculator, then the data for calculating the average vacation pay will also be used to calculate sick leave. Quite controversial behavior of the program and that is why I recommend checking the box TAKE OFF;
- When recalculating an employee's tariff rate into the cost of an hour (day) use– this setting is required so that the program understands how to recalculate an employee’s monthly salary into daily or hourly wages. Such a recalculation is necessary, for example, when calculating Night, Evening, Work on holidays and weekends. In general, when calculating those accruals that use the “Cost of a Day of an Hour” indicator in the formula;
- Indicators determining the composition of the aggregate tariff rate- this setting is inextricably linked with the previous one. Here it is determined what exactly is included in the total tariff rate, from which the “Cost of a Day of an Hour” is calculated - read more on this topic
- Register compensation for delayed salary payments as taxable income- discussed in the article
HR accounting settings in 1C ZUP 3.0
Another similar group of settings concerns personnel accounting parameters ( section Settings -> Personnel records).
- Use of part-time work– it will be possible to indicate in the “Hiring” or “Personnel Transfer” document an incomplete number of rates for which the employee is being hired. Articles