DIY telescope made from a magnifying glass. How to assemble a telescope with your own hands: a budget solution
Do you suddenly want to make a telescope with your own hands? Nothing strange. Yes, nowadays it is not difficult to buy almost any optical device, and not so expensive. But sometimes a person is attacked by a thirst for creativity: he wants to figure out what laws of nature the principle of operation of a device is based on, he wants to design such a device from start to finish and experience the joy of creativity.
DIY spyglass
So, you get down to business. First of all, you will learn that the simplest telescope consists of two biconvex lenses - the objective and the eyepiece, and that the magnification spyglass obtained by the formula K = F / f (the ratio of the focal lengths of the lens (F) and eyepiece (f)).
Armed with this knowledge, you go digging through boxes of various junk, in the attic, garage, shed, etc. with a clearly defined goal - to find more different lenses. These could be glasses from glasses (preferably round ones), watch magnifiers, lenses from old cameras, etc. Having collected a supply of lenses, start measuring. You need to choose a lens with a larger focal length F and an eyepiece with a smaller focal length f.
Measuring focal length is very simple. The lens is directed at some light source (a light bulb in the room, a lantern on the street, the sun in the sky or just a lit window), a white screen is placed behind the lens (a sheet of paper is possible, but cardboard is better) and moves relative to the lens until It will not produce a sharp image of the observed light source (inverted and reduced).
After this, all that remains is to measure the distance from the lens to the screen with a ruler. This is the focal length. You are unlikely to cope with the described measurement procedure alone - you will need a third hand. You'll have to call an assistant for help.

Once you have selected your lens and eyepiece, you begin constructing the optical system for magnifying the image. You take the lens in one hand, the eyepiece in the other, and through both lenses you look at some distant object (not the sun - you can easily be left without an eye!). By mutually moving the lens and eyepiece (trying to keep their axes on the same line), you achieve a clear image.
The resulting image will be enlarged, but still upside down. What you are now holding in your hands, trying to maintain the achieved relative position of the lenses, is the desired optical system. All that remains is to fix this system, for example, by placing it inside a pipe. This will be the spyglass.

But don't rush into assembly. Having made a telescope, you will not be satisfied with the image “upside down”. This problem is solved simply by a wrapping system obtained by adding one or two lenses identical to the eyepiece.
You can obtain a wraparound system with one coaxial additional lens by placing it at a distance of approximately 2f from the eyepiece (the distance is determined by selection).
It is interesting to note that with this version of the reversing system, it is possible to obtain greater magnification by smoothly moving the additional lens away from the eyepiece. However, you won’t be able to get a strong magnification if you don’t have a very high-quality lens (for example, glass from glasses). The phenomenon of so-called “chromatic aberration” interferes, when the image is painted in rainbow shades.
This problem is solved in “purchased” optics by composing a lens from several lenses with different refractive indices. But you don’t care about these details: your task is to understand the circuit diagram of the device and build the simplest working model according to this scheme (without spending a penny).

You can obtain a wraparound system with two coaxial additional lenses by positioning them so that the eyepiece and these two lenses are spaced from each other at equal distances f.

Now you have an idea of the telescope design and know the focal lengths of the lenses, so proceed to assembly optical device. The simplest thing is to twist pipes (tubes) from sheets of whatman paper, securing them with rubber bands “for money”, and fix the lenses inside the tubes with plasticine. The inside of the pipes must be painted with matte black paint to prevent external exposure.
The result seems to be something primitive, but as a zero option it is very convenient: it’s easy to remake, change something. When this zero option exists, it can be improved for as long as desired (at least replace the Whatman paper with more decent material).
Probably everyone in their life has been at least a little interested in astronomy and wanted to have with them an instrument that would allow them to take a closer look at the mysteries of the starry sky.
It’s good if you have binoculars or a telescope - even with such rather weak astronomical instruments you can already admire the beauty of the starry sky. But if your interest in this science is strong enough, but there is no access to the tool at all, or the available tools do not satisfy your curiosity, you will still need more powerful tool — telescope which you can do yourself at home. In our article step-by-step instruction with photos and videos on how to make a telescope with your own hands.
A factory-made telescope will cost you quite a lot, so purchasing it is only appropriate if you want to engage in amateur or amateur astronomy. professional level. But first, to acquire basic knowledge and skills, and finally understand whether astronomy is really your thing, you should try to make a telescope with your own hands.
In many children's encyclopedias and other scientific publications you can find a description of how to make a simple telescope. Already such a tool will allow you to see craters on the Moon, the disk of Jupiter and its 4 satellites, the disk and rings of Saturn, the crescent of Venus, some large and bright star clusters and nebulae, stars, invisible to the naked eye. It is immediately worth noting that such a telescope cannot claim image quality in comparison with factory-made telescopes due to the mismatch of the purpose of the optics that will be used.
Telescope device
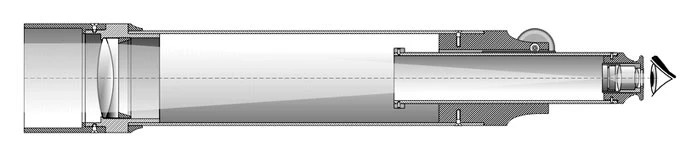
First, a little theory. The telescope, as in the photo, consists of two optical units - lens And eyepiece. The lens collects light from objects; its diameter directly determines the maximum magnification of the telescope and how faint objects can be observed. The eyepiece magnifies the image formed by the lens, followed by the human eye in the optical design.
There are several types optical telescopes, two of the most common are refractor And . The reflector lens is represented by a mirror, and the refractor lens is represented by a system of lenses. At home, making a mirror for a reflector is a rather labor-intensive and precise process that not everyone can do. Unlike a reflector, inexpensive refractor lenses can be easily purchased at an optical store.
Increase telescope is equal to the ratio Fob/Fok (Fob is the focal length of the lens, Fok is the eyepiece). Our telescope will have a maximum magnification of about 50x.
To make a lens, you need to purchase a spectacle lens blank with a power of 1 diopter, which corresponds to a focal length of 1 m. Such blanks usually have a diameter of about 70 mm. Unfortunately, spectacle lenses made in the form of menisci are poorly suited for this application, but you can stop at them. If you have a long focal length biconvex lens, it is recommended to use this one.
An ordinary magnifying glass (loupe) with a small diameter of about 30 mm can serve as an eyepiece. A good option there may also be an eyepiece from a microscope.
As housing you can use two tubes made of thick paper, one short - about 20 cm (eyepiece unit), the second about 1 m (the main part of the tube). The short pipe is inserted into the long one. The body can be made either from a wide sheet of whatman paper, or from a roll of wallpaper, rolled into a tube in several layers and glued with PVA glue. The number of layers is selected manually until the pipe becomes sufficiently rigid. The inner diameter of the main pipe should be equal to the diameter of the spectacle lens.
The lens (spectacle lens) is mounted in the first tube with the convex side outward using a frame - rings with a diameter equal to the diameter of the lens and a thickness of about 10 mm. A disk is installed immediately behind the lens - diaphragm with a hole in the center with a diameter of 25 - 30 mm - this is necessary in order to reduce significant image distortions resulting from a single lens. This will reduce the amount of light collected by the lens. The lens is installed closer to the edge of the main tube.
The eyepiece is installed in the eyepiece assembly closer to its edge. To do this, you will have to make an eyepiece mount from cardboard. It will consist of a cylinder equal in diameter to the eyepiece. This cylinder will be attached to inside pipes with two disks with a diameter equal to the internal diameter of the eyepiece assembly with a hole equal in diameter to the eyepiece.
Focusing will be done by changing the distance between the lens and the eyepiece, due to the movement of the eyepiece assembly in the main tube, and fixation will occur due to friction. It is convenient to focus on bright and large objects, such as the Moon, bright stars, and nearby buildings.
When building a telescope, it is necessary to take into account that the lens and eyepiece must be parallel to each other, and their centers must be strictly on the same line.
You can also experiment with the diameter of the aperture opening and find the optimal one. If you use a lens with an optical power of 0.6 diopters (the focal length is 1/0.6, which is about 1.7 m), this will increase the aperture opening and increase the magnification, but will increase the length of the tube to 1.7 m.
It is always worth remembering that you should not look at the sun through a telescope or any other optical device. This will instantly damage your vision.
So, you have become familiar with the principle of building a simple telescope and can now make it yourself. There are other telescope options from spectacle lenses or telephoto lenses. Any manufacturing details, as well as other information you are interested in, can be found on websites and forums on astronomy and telescope construction. This is a very broad field, and is practiced by both complete beginners and professional astronomers.
And remember, you just have to plunge into the previously unknown world of astronomy - and if you wish, it will show you many treasures of the starry sky, teach you the techniques of observation, photographing completely different objects and much more that you didn’t even know about.
Clear skies to you!
Video: how to make a telescope with your own hands
Many people, looking up at the starry sky, admire the alluring mystery of outer space. I want to look into the endless expanses of the universe. See craters on the moon. Rings of Saturn. Many nebulae and constellations. So today I will tell you how to make a telescope at home.
First, you need to decide how much magnification is required. The fact is that the larger this value, the longer the telescope itself will be. At 50x magnification the length will be 1 meter, and at 100x magnification it will be 2 meters. That is, the length of the telescope will be directly proportional to the magnification.
Let's say it will be a 50x telescope. Next, you need to purchase two lenses at any optics store (or on the market). One for the eyepiece (+2)-(+5) dioptres. The second is for the lens (+1) diopter (for a 100x telescope, (+0.5) diopter is required).
Then, taking into account the diameters of the lenses, it is necessary to make a pipe, or rather two pipes - one should fit tightly into the other. Moreover, the length of the resulting structure (in the extended state) should be equal to the focal length of the lens. In our case, 1 meter (for a lens (+1) diopter).
How to make pipes? To do this, you need to wrap several layers of paper on a frame of the appropriate diameter, coating them with epoxy resin (you can use other glue, but the last layers are better strengthened with epoxy). You can use the remnants of wallpaper that are lying around idle after renovating your apartment. You can experiment with fiberglass, then it will be a more serious design.
Next, we build the objective lens (+1) diopter into the outer tube, and (+3) diopter into the inner eyepiece. How to do it? Your imagination is the main thing to ensure precise parallelism and alignment of the lenses. In this case, it is necessary to ensure that the distance between the lenses when moving the pipes apart is within the focal length of the objective lens, in our case it is 1 meter. In the future, by changing this parameter, we will adjust the sharpness of our image.
For convenient use of the telescope, a tripod is needed to clearly fix it. At high magnification The slightest trembling of the pipe leads to blurring of the image.
If you have any lenses, you can find out their focal length in the following way: focus sunlight onto a flat surface until you get the smallest point possible. The distance between the lens and the surface is the focal length.
So, to achieve a telescope magnification of 50 times, you need to place a lens of (+1) diopter at a distance of 1 meter from the lens of (+3) diopter.
For 100x magnification, we use lenses (+0.5) and (+3) changing the distance between them by 2 meters.
And this video shows the process of creating a similar telescope:
Enjoy your astronomical viewing!
(Visited 11,426 times, 1 visits today)
Now I propose to familiarize yourself with how to make a simple telescope from available materials.
To make it you will need at least two lenses (lens and eyepiece).
Any long-focus lens from a photo or movie camera, a theodolite lens, a level lens, or any other optical device will be suitable as a lens.
We will begin making the tube by determining the focal lengths of the lenses at our disposal and calculating the magnification of the future device.
The method for determining the focal length of a converging lens is quite simple: we take the lens in our hand and, placing its surface towards the sun or lighting device, we move it up and down until the light passing through the lens gathers into a small point on the screen (sheet of paper ). Let us achieve a position in which further vertical movements lead to an increase in the spot of light on the screen. By measuring the distance between the screen and the lens using a ruler, we obtain the focal length of this lens. On photo and movie camera lenses, the focal lengths are indicated on the body, but if you can’t find a ready-made lens, it doesn’t matter, it can be made from any other lens with a focal length not exceeding 1 m (otherwise the telescope will turn out to be long and will lose its compactness - after all, the length of the tube depends on the focal length of the lens), but a lens that is too short-focus is not suitable for this purpose - a short focal length will affect the magnification of our telescope. As a last resort, the lens can be made from spectacle glasses, which are sold in any optics.
The focal length of one such lens is determined by the formula:
F = 1/Ф = 1 m,
Where F – focal length, m; F – optical power, dioptre. The focal length of our lens, consisting of two such lenses, is determined by the formula:
Fo = F1F2/F1 + F2 – d,
Where F1 and F2 are the focal lengths of the first and second lenses, respectively; (in our case F1 = F2); d is the distance between the lenses, which can be neglected.
Thus Fo = 500 mm. Under no circumstances should lenses be placed with concavities (menisci) facing each other - this will increase spherical aberration. The distance between lenses should not exceed their diameter. The diaphragm is made of cardboard, and the diameter of the diaphragm hole is slightly smaller than the diameter of the lenses.
Now let's talk about the eyepiece. It is best to use a ready-made eyepiece from a binocular, microscope or other optical device, but you can get by with a magnifying glass of suitable size and focal length. The focal length of the latter should be in the range of 10 – 50 mm.
Suppose that we managed to find a magnifying glass with a focal length of 10 mm, all that remains is to calculate the magnification of the device G, which we obtain by assembling an optical system from a given eyepiece and a lens from spectacle glasses:
G = F/f = 500 mm/10 mm = 50,
Where F is the focal length of the lens; f – focal length of the eyepiece.
It is not necessary to look for an eyepiece with the same focal length as in the example given; any other lens with a short focal length will do, but the magnification will correspondingly decrease if f increases, and vice versa.
Now, having selected the optical parts, we will begin to manufacture the bodies of the telescope and eyepiece. They can be made from suitable-sized scraps of aluminum or plastic pipe, or they can be glued together from paper on special wooden blanks using epoxy glue.
The lens tube is made 10 cm shorter than the focal length of the lens, the eyepiece tube usually has a length of 250 - 300 mm. Internal surfaces pipes are coated with matte black paint to reduce scattered light.
Such a pipe is easy to manufacture, but has one significant drawback: the image of objects in it will be “upside down”. If this drawback does not matter for astronomical observations, then in other cases it causes some inconvenience. The disadvantage can be easily eliminated by introducing a diverging lens into the design, but this will negatively affect image quality and the ability to magnify, and choosing a suitable lens is quite difficult.
It's safe to say that everyone has dreamed of taking a closer look at the stars. You can use binoculars or a spotting scope to admire the bright night sky, but you are unlikely to be able to see anything in detail through these devices. Here you will need more serious equipment - a telescope. To have such a miracle of optical technology at home, you need to lay out a large sum, which not all lovers of beauty can afford. But don't despair. You can make a telescope with your own hands, and for this, no matter how absurd it may sound, you don’t have to be a great astronomer and designer. If only there was a desire and an irresistible craving for the unknown.
Why should you try making a telescope?
We can definitely say that astronomy is a very complex science. And it requires a lot of effort from the person doing it. A situation may occur that you purchase an expensive telescope, and the science of the Universe will disappoint you, or you simply realize that this is not your thing at all.
In order to figure out what’s what, it’s enough to make a telescope for an amateur. Observing the sky through such a device will allow you to see many times more than through binoculars, and you will also be able to figure out whether this activity is interesting to you. If you are passionate about studying the night sky, then, of course, you cannot do without a professional apparatus.
What can you see with a homemade telescope?
Descriptions of how to make a telescope can be found in many textbooks and books. Such a device will allow you to clearly see the lunar craters. With it you can see Jupiter and even make out its four main satellites. The rings of Saturn, familiar to us from the pages of textbooks, can also be seen using a telescope made by ourselves. In addition, many more celestial bodies can be seen with your own eyes, for example, Venus, a large number of stars, clusters, nebulae.
A little about the telescope design
The main parts of our unit are its lens and eyepiece. With the help of the first part, the light emitted by celestial bodies is collected. How distant bodies can be seen, as well as the magnification of the device, depends on the diameter of the lens. The second member of the tandem, the eyepiece, is designed to enlarge the resulting image so that our eye can admire the beauty of the stars.

Now about the two most common types of optical devices - refractors and reflectors. The first type has a lens made of a lens system, and the second has a mirror lens. Lenses for a telescope, unlike a reflector mirror, can be found quite easily in specialized stores. Buying a mirror for a reflector will not be cheap, but self-production will be impossible for many. Therefore, as has already become clear, we will be assembling a refractor, and not a reflecting telescope. Let's finish the theoretical excursion with the concept of telescope magnification. It is equal to the ratio of the focal lengths of the lens and eyepiece.
How to make a telescope? We select materials
In order to start assembling the device, you need to stock up on a 1-diopter lens or its blank. By the way, such a lens will have a focal length of one meter. The diameter of the blanks will be about seventy millimeters. It should also be noted that it is better not to choose spectacle lenses for a telescope, since they generally have a concave-convex shape and are poorly suited for a telescope, although if you have them on hand, you can use them. It is recommended to use long-focal lenses with a biconvex shape.
As an eyepiece, you can take a regular magnifying glass with a thirty-millimeter diameter. If it is possible to get an eyepiece from the microscope, then it is certainly worth taking advantage of. It is also perfect for a telescope.

What should we make the housing for our future optical assistant from? Two pipes of different diameters made of cardboard or thick paper are perfect. One (the shorter one) will be inserted into the second, with a larger diameter and longer. A pipe with a smaller diameter should be made twenty centimeters long - this will ultimately be the eyepiece unit, and it is recommended to make the main one a meter long. If you don’t have the necessary blanks at hand, it doesn’t matter, the body can be made from an unnecessary roll of wallpaper. To do this, the wallpaper is wound in several layers to create the required thickness and rigidity and glued. How to make the diameter of the inner tube depends on what kind of lens we use.
Telescope stand
Very important point in creating your own telescope - preparing a special stand for it. Without it, it will be almost impossible to use it. There is an option to install the telescope on a camera tripod, which is equipped with a moving head, as well as fasteners that allow you to fix various provisions housings.
Telescope assembly
The lens for the lens is fixed in a small tube with its convex outward. It is recommended to fasten it using a frame, which is a ring similar in diameter to the lens itself. Directly behind the lens, further along the pipe, it is necessary to equip a diaphragm in the form of a disk with a thirty-millimeter hole exactly in the middle. The purpose of the aperture is to eliminate image distortion caused by the use of a single lens. Also, installing it will affect the reduction of light that the lens receives. The telescope lens itself is mounted near the main tube.
Naturally, the eyepiece assembly cannot do without the eyepiece itself. First you need to prepare fastenings for it. They are made in the form of a cardboard cylinder and are similar in diameter to an eyepiece. The fastening is installed inside the pipe using two disks. They are the same diameter as the cylinder and have holes in the middle.
Setting up the device at home
The image must be focused using the distance from the lens to the eyepiece. To do this, the eyepiece assembly moves in the main tube. Since the pipes must be well pressed together, the required position will be securely fixed. It is convenient to perform the tuning process on large bright bodies, for example, the Moon; a neighboring house will also work. When assembling, it is very important to ensure that the lens and eyepiece are parallel and their centers are on the same straight line.

Another way to make a telescope with your own hands is to change the size of the aperture. By varying its diameter, you can achieve the optimal picture. Using optical lenses 0.6 diopters, which have a focal length of approximately two meters, you can increase the aperture and make the zoom on our telescope much larger, but you should understand that the body will also increase.
Watch out - Sun!
By the standards of the Universe, our Sun is far from the most bright Star. However, for us it is a very important source of life. Naturally, having a telescope at their disposal, many will want to take a closer look at it. But you need to know that this is very dangerous. After all, sunlight, passing through what we have built optical systems, can focus to such an extent that it will be able to burn through even thick paper. What can we say about the delicate retina of our eyes?

Therefore, you need to remember very important rule: you cannot look at the Sun through zooming devices, especially a home telescope, without special means protection. Such means are considered to be light filters and a method of projecting an image onto a screen.
What if you couldn’t assemble a telescope with your own hands, but you really want to look at the stars?
If suddenly for some reason the assembly homemade telescope is impossible, then do not despair. You can find a telescope in a store for a reasonable price. The question immediately arises: “Where are they sold?” Such equipment can be found in specialized astro-device stores. If there is nothing like this in your city, then you should visit a photographic equipment store or find another store that sells telescopes.
If you are lucky, there is a special shop, and even with professional consultants, then you are definitely in the right place. Before going, it is recommended to look at an overview of telescopes. First, you will understand the characteristics of optical devices. Secondly, it will be more difficult to deceive you and slip you a low-quality product. Then you will definitely not be disappointed in your purchase.

A few words about buying a telescope through the World Wide Web. This type of shopping is becoming very popular nowadays, and it is possible that you will use it. It’s very convenient: you look for the device you need, and then order it. However, you may come across the following nuisance: after a long selection, it may turn out that the product is no longer in stock. A much more unpleasant problem is the delivery of goods. It is no secret that a telescope is a very fragile thing, so only fragments can be delivered to you.
It is possible to purchase a telescope by hand. This option will allow you to save a lot of money, but you should be well prepared so as not to buy a broken item. A good place to find a potential seller is astronomer forums.

Price per telescope
Let's look at some price categories:
About five thousand rubles. Such a device will correspond to the characteristics of a telescope made with your own hands at home.
Up to ten thousand rubles. This device will certainly be more suitable for high-quality observation of the night sky. The mechanical part of the body and equipment will be quite poor, and you may have to spend money on some spare parts: eyepieces, filters, etc.
From twenty to one hundred thousand rubles. This category includes professional and semi-professional telescopes. Surely a beginner will have no need for a mirror camera with an astronomical cost. This is simply, as they say, a waste of money.

Conclusion
As a result, we met important information about how to make a simple telescope with your own hands, and some nuances of buying a new device for observing the stars. In addition to the method that we have considered, there are others, but this is a topic for another article. Whether you've built a telescope at home or purchased a new one, astronomy will take you into the unknown and provide experiences you've never experienced before.